Designing a studio apartment with Sweet Home 3D can be a fun yet challenging project. With limited space, every inch counts. The key to creating a functional and stylish studio lies in smart design choices that maximize space and improve flow. When details are so important and there’s (literally) no room for mistakes, it can actually take a lot of time and a lot of trial and error before getting it right. Fortunately, Sweet Home 3D is the perfect tool for this task, as it allows you to visualize and experiment with different layouts before making any decisions in the real world.
In this home design tutorial, we will walk you through the steps to design a stylish and functional studio apartment using Sweet Home 3D. Let’s go!
Step 1: Set Up Your Project
First, open Sweet Home 3D and create a new project. The first thing you’ll need to do is set the dimensions of your studio apartment. You can either start with an empty floor plan or import a blueprint if you have one. This will provide a base layout and ensure that the measurements are accurate.
Step 2: Create Walls and Dividers
Once you’ve set up your floor plan, it’s time to create the layout. In a studio apartment, space planning is critical. You’ll want to divide the apartment into key functional areas such as the living area, bedroom, kitchen, and bathroom.
Use the Wall Tool to draw the perimeter walls of your apartment.
Consider whether you want to add partition walls to separate different areas of the space (e.g., a divider between the sleeping area and the living area). If you want to divide spaces but don’t wanna put walls, which can make the space feel smaller than it already is, you can opt for some partition items in the furniture section later on.
You can also experiment with open floor plans, where the kitchen and living area blend seamlessly. Your space will feel airy, bigger and more dynamic!
Step 3: Add Furniture
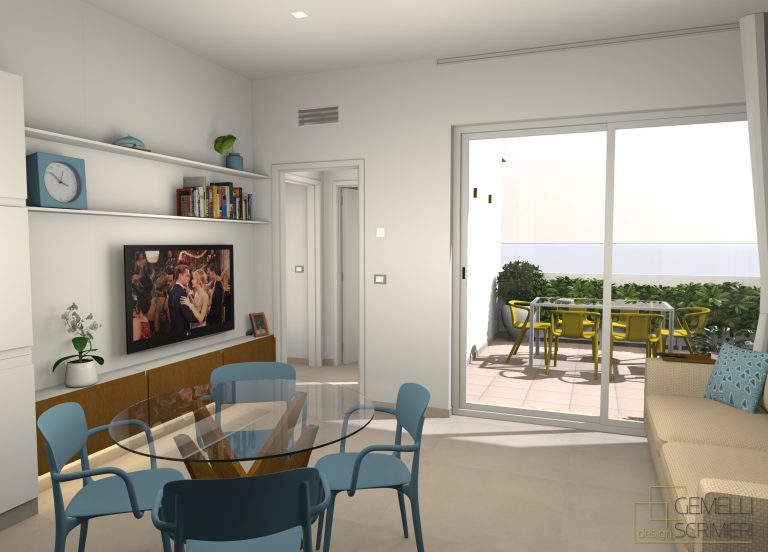
Now comes the fun part—furnishing your studio apartment! Sweet Home 3D offers a large catalog of furniture, which you can easily drag and drop into your layout. For a studio, you’ll need to choose furniture that is both compact and multi-functional.
Living Area: Choose a space-saving sofa, such as a sofa bed or a small sectional. Add a coffee table and a TV stand if the space allows.
Bedroom Area: In a studio, the bed often doubles as the focal point of the room. You can select a platform bed with built-in storage underneath to maximize space.
Kitchen Area: If your studio has an open kitchen, place compact appliances such as a mini-fridge, microwave, and two-burner stove. Don’t forget about cabinetry to store your essentials!
Storage Solutions: In a small space, smart storage is essential. Opt for multi-functional furniture pieces like storage ottomans or floating shelves that can hold items without taking up floor space.
Sweet Home 3D allows you to rotate, scale and fully customize elements and textures of the furniture, so you can ensure everything fits perfectly and reflects your personal taste.
Step 4: Optimize the Layout
After placing the furniture, it’s time to optimize the small studio layout. You want to make sure there is enough space for movement and flow between different areas. This is when the experimenting start, and you can try different arrangements to see which one is the best. Try to avoid overcrowding the apartment with too many pieces, and leave clear pathways for walking between zones.
Ensure that furniture is positioned to create a sense of balance. You might want to place your sofa near the wall or in the center of the room to create a cozy, defined living area.
Add rugs or flooring materials to visually separate areas, such as placing a rug under the bed or seating area to define these zones.
Step 5: Add Lighting and Decor
Lighting plays a crucial role in making a small space feel larger and more inviting. In Sweet Home 3D, you can experiment with various light sources and positions.
Ambient Lighting: Start with ceiling lights to provide general illumination.
Task Lighting: Add table lamps near the bed or desk, and pendant lights over the kitchen counter or dining area.
Accent Lighting: Use wall sconces or floor lamps to highlight key areas or artwork.
For decor, use minimalist pieces such as small plants, artwork, or decorative accessories. Keep the design simple to avoid making the space feel cluttered.
Step 6: Export and Share Your Design
Once you are satisfied with your design, you can render your model in high quality or create a virtual tour to explore your space in more detail. You can also save and export your design in various formats, making it easy to share with others or present your idea.
Go to 3D View > virtual mode to display the virtual visitor
Go to Create Photo or Create Video to make the render and follow the instructions.
Save your project and share it with friends, clients, or colleagues to gather feedback.
Designing a studio apartment requires thoughtful planning, especially when space is limited. With Sweet Home 3D, you can easily create a functional and stylish layout that maximizes every square foot of your apartment.
So, get started with Sweet Home 3D today! If you haven’t downloaded it yet, grab it here!