Hi,
Sweet Home 3D 7.2 is on its way and comes with some important improvements among which:
- a new modification dialog box to edit dimensions
- creation of elevation dimensions
- the ability to directly handle items in the 3D view
- magnetism on shelf units
Interested? Here are the details, after a disclaimer:
If you use Pan3dView plug-in developed by Daniels118, be sure to update it if you want to continue to use it with Sweet Home 3D 7.2.
- Editing dimensions and elevation dimensions:
The new Plan > Modify dimensions menu item or a double click on a dimension now displays a modification dialog box to let you enter directly its coordinates.

When you modify two or more dimensions with this pane, the Distance between end points field won't be shown because it's often too complicated to handle such modifications.
This pane lets you change the coordinates, the font size and the color of the dimensions, as well as choose if dimensions should be visible in the 3D view. When a dimension is visible in the 3D view, it's possible to change its elevation and the text of its length is always written in the correct direction whatever the current point of view.
This pane proposes also to choose whether a dimension should be a Plan dimension or an Elevation dimension, i.e. a dimension starting and ending at the same X / Y coordinates but spreading vertically between two elevations along a given distance, as shown in the following image for the selected dimension 180.
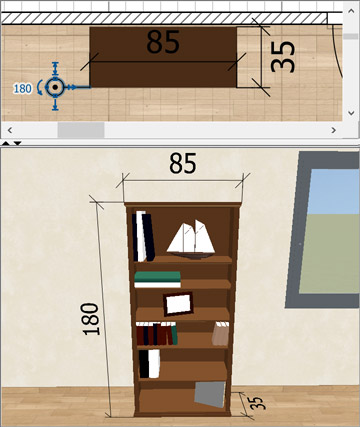
An elevation dimension is displayed in the plan with the following symbol showing two circles (something like an arrow seen from top) and an extension line.

When selected, an elevation dimension shows its height and 4 indicators to set the elevation of its start point, its height, the offset of the extension lines and its angle around elevation axis. You may create elevation dimensions directly with Dimensions creation tool if you press the Ctrl key (alt/option key under macOS) while clicking at the first point of the dimension in the plan. In that case, the Dimension pane will be shown after the click with Elevation dimension and Visible in 3D view selected options and a default distance between end points equal to home wall height. Just adjust the values and confirm your choice to create the elevation dimension accordingly.
Dimensions visible in the 3D view will be rendered in the photo creation tool too, but only at the two lower quality levels. It wouldn't be impossible to handle them at the higher quality levels, put I think it's not interesting and dimensions shadows might just add confusion.
- Handling items in the 3D view:
The new Selection and editing in 3D view option was added in the preferences pane.
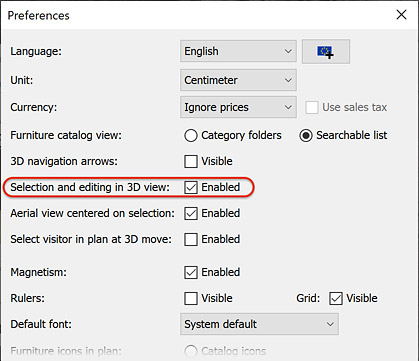
When this option is enabled, you'll be able to:
• select objets in the 3D view with a simple click (Shift + click to toggle its selection). Selected objects are surrounded by a half transparent blue line and the front face of selected furniture shows crossed lines.
• modify an object by double clicking on it
• use the items of Edit menu when the 3D view has focus
• move selected furniture in the 3D view with a drag and drop, where magnetism (toggled with Alt key / command key under macOS), alignment along X / Y axes (Shift key after you started to move the mouse), duplication (Ctrl key / option key under macOS after you started to move the mouse) works like in the plan. Moved furniture remain at the same elevation, and their x / y coordinates are updated according to the current view angle, while vertical mouse moves are converted to moves along the depth. Only furniture can move because I feel that there are too many circumstances where you wouldn't be able to navigate in the 3D view if other selected items like walls or rooms could be moved too.
• elevate the selected piece of furniture or furniture group by pressing the Ctrl key / option key under macOS before you start to move it
• drag and drop an item of the catalog in the 3D view to add it to the plan. Objects dropped on a wall appear along that wall or in the wall for doors and windows. An object dropped on an other piece will be elevated at the elevation defined by the dropOnTopElevation property if defined, and an object dropped on a shelf unit defining a shelfElevations or shelfBoxes property (see below) will appear at the elevation of the shelf where the object was dropped and at the middle of the shelf unit depth.
It would be probably nice to have some feedback when you drop an object from the catalog in the 3D view, for example by showing the contour of its bounds where it will actually appear. Maybe for an other version... meanwhile keep in mind that the piece of furniture on which you want to drop a catalog item must be under the mouse cursor to be taken into account.
The following clip shows on it works.
- Magnetism on shelf units:
Sweet Home 3D proposes the two new properties shelfElevations and shelfBoxes to define the locations of shelves in a shelf unit.
If either of properties is defined for a piece of furniture, magnetism on its shelves will be applied on the objects placed on them when you change their elevation, like the card game in the previous clip.
• shelfElevations property is defined with a list of numbers in cm from the lowest to the highest elevation, like the bedside table, the bookcase, the glass door cabinet and bunk beds found in the default furniture catalog.
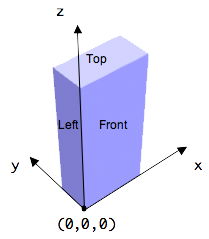
• shelfBoxes property lists the coordinates of the boxes where objects can be placed, each box being defined by 6 values matching the (x, y, z) coordinates in cm of the left, front, bottom lower point and the right, back, top upper opposite point of the box. When you move an object placed on a shelf unit defining shelfBoxes# property, it's magnetized within the limits of each box of the shelf unit.
Keep in mind that when defining these coordinates, axis directions and origin of the describe box are as in the following image. If you have 4 boxes, you'll have to enter 24 values in the shelfBoxes property field. To help you recognize groups of 6 values, you may add spaces between values. If you wan't to be able to place objects on the top of the shelf unit, the bottom of the last shelf box should match the top of the shelf unit.
For example, the filled book case shown in above clip and available in the default furniture catalog defines the following shelfBoxes property value:
2.3 1.4 5.4 53.2 33.8 33.5 21.8 1.4 34.8 82.7 33.8 63.4 38.3 1.4 64.7 68 33.8 87.7 2.3 1.4 89 26.3 33.8 114 52.2 1.4 89 82.7 33.8 114 40.9 1.4 115.3 82.7 33.8 134.7 19.3 1.4 136 29.3 33.8 176.6 68.8 1.4 136 82.7 33.8 176.6 0 0 180 85 35 250
When the card game is moved to the right on the third shelf in the clip, you'll see that it's magnetized to the left border of the box defined by the coordinates (38.3 1.4 64.7) and (68 33.8 87.7).
This is helpful to fill a bookcase more quickly, but depends also on how patient you'll be to define all these shelf boxes in the 3D models you'll create. Anyway, you always have the choice to define shelfElevations easier property instead.
If you want to try with more shelf units or furniture containing shelves, I already defined the shelfElevations or shelfBoxes property of the 44 ones found in the Contributors library that you may try with the Beta version 1.9.1 of furniture libraries.

- Other features:
• You may recompute the points of the selected room with the new Recompute room points item added to plan contextual menu. If this item doesn't appear, it means that you didn't right click on the selected room or that the point where you right clicked isn't surrounded by a closed set of walls.
• 3D updates process will be now deactived when the 3D view is hidden. No need to relaunch the program!
• The Description information recently added to furniture can now be displayed in the furniture table with the Furniture > Display column > Description menu item.
• The license property was added to furniture libraries and you can view this information with Furniture > Display column > License menu item if it exists (I'll add the property on all the items of the furniture libraries distributed on sweethome3d.com). I could show the license information in the information tool tip of the catalog too, but I'm a little reluctant to make this tool tip grow once more.
• It's possible to define additional furniture properties to handle customized user data associated to the objects added to your home. This data may be displayed in the furniture list, modified in the furniture dialog box and/or exported to CSV.
For the moment, there's no user interface to define these properties and they must be cited in the System property named "com.eteks.sweethome3d.additionalFurnitureProperties", each property being separated from others with a coma like in "Data, Code, Special" which describes 3 new properties. Setting this System property can be done with the -D Java option in a SweetHome3D.l4j.ini file stored in the same folder as SweetHome3D.exe under Windows, in SweetHome3D.cfg configuration file found in Sweet Home 3D.app folder under macOS or by modifying java command line in Sweet Home 3D script under Linux.
The additional properties can also be set from plug-ins using the methods getFurnitureAdditionalProperties / setFurnitureAdditionalProperties added to Home class.
The added furniture properties will appear in the Furniture > Sort by and Furniture > Display column menus to let you display them in the furniture list like in the following screenshot, which handles the three columns in SweetHome3D.l4j.ini file with the line:
-Dcom.eteks.sweethome3d.additionalFurnitureProperties="Data, Code, Special"
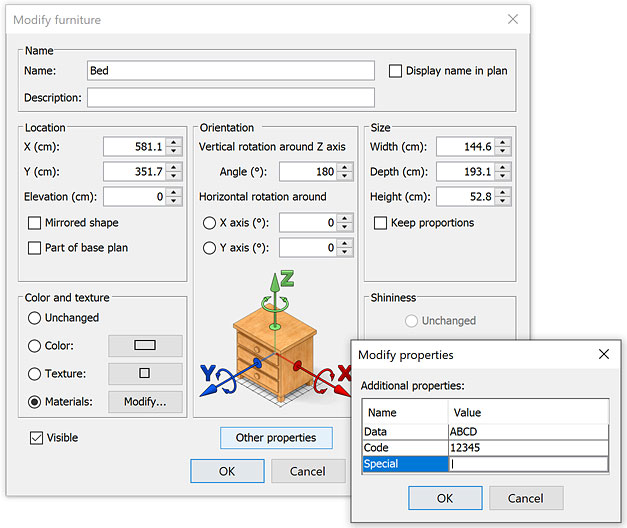
You will be also able to modify the property values for each piece of furniture thanks to the new Other properties button added at the bottom of the Modify furniture dialog box, when such properties are defined.
As the value of additional properties set in a furniture library will be copied to a new home object when it's added to the plan from version 7.2, you may give the initial value of these properties in a SH3F file.
By default, additional properties and their values are exported to CSV files too.
But com.eteks.sweethome3d.additionalFurnitureProperties System property can also describe the type of each property and whether it should be displayable in the furniture list, modifiable in furniture modification pane and exportable to a CSV file. It can also describe the label of the property which should be displayed in the user interface.
To use these features, a property must be followed by the following information ( | symbol means or):
:ANY | STRING | BOOLEAN | INTEGER | NUMBER | PRICE | LENGTH | PERCENTAGE | DATE | CONTENT
displayable=true | false
modifiable=true | false
exportable=true | false
displayedName=Text label
For example, if com.eteks.sweethome3d.additionalFurnitureProperties System property is equal to:
"AltCode:INTEGER modifiable=false displayedName=Alt. code"If com.eteks.sweethome3d.additionalFurnitureProperties System property is equal to:
"QR:CONTENT displayedName=QR Code, Rebate: PERCENTAGE"By default, the type of a furniture property is ANY, i.e. it can handle any type of value. However, when the furniture list is sorted on a property of type ANY, values containing numbers will be sorted in correct order (meaning 100 will appear after 12 in ascending order).
As shown in the following screenshot, the Value column of Modify properties dialog box will show:
1. a Modify button with the selected image for a type equal to CONTENT,
2. a check box for BOOLEAN type,
3. and a formatted text for the INTEGER, NUMBER, PRICE, LENGTH, PERCENTAGE and DATE types.
Selecting the later types will also force the user to enter the correct information.
Additional content values will be saved in the .SH3D file, values of type LENGTH will be saved in centimeter and values of type DATE will be saved in the format yyyy-MM-dd (for example, 2023-05-20).

Finally, this new version handles also correctly objects showing some textures with a transparency in YafaRay renderer, and the 64 bit and ARM versions of Sweet Home 3D installers come with the JOGL update 20230521-v2.5.0-rc. Please, report any issue you encountered if the 3D view doesn't seem to work correctly (or it works better too).
All these new features come also with the ability to edit any property in the Furniture Library Editor and view dimensions in the SideView plug-in. But that's enough for me today, and I will explain these other things tomorrow.
Hope you'll like this new version

[Note: the final version of Sweet Home 3D 7.2, along with updated furniture libraries were released on 09/22/2023]
----------------------------------------
Emmanuel Puybaret, Sweet Home 3D creator