|
Sweet Home 3D Forum » List all forums » » Forum: Forum in other languages » » » Thread: Stromzählerkasten |
|
| Print at Jun 25, 2026, 2:25:53 AM | |
| Posted by wdvs.profi at Jun 11, 2024, 2:58:16 PM |
|
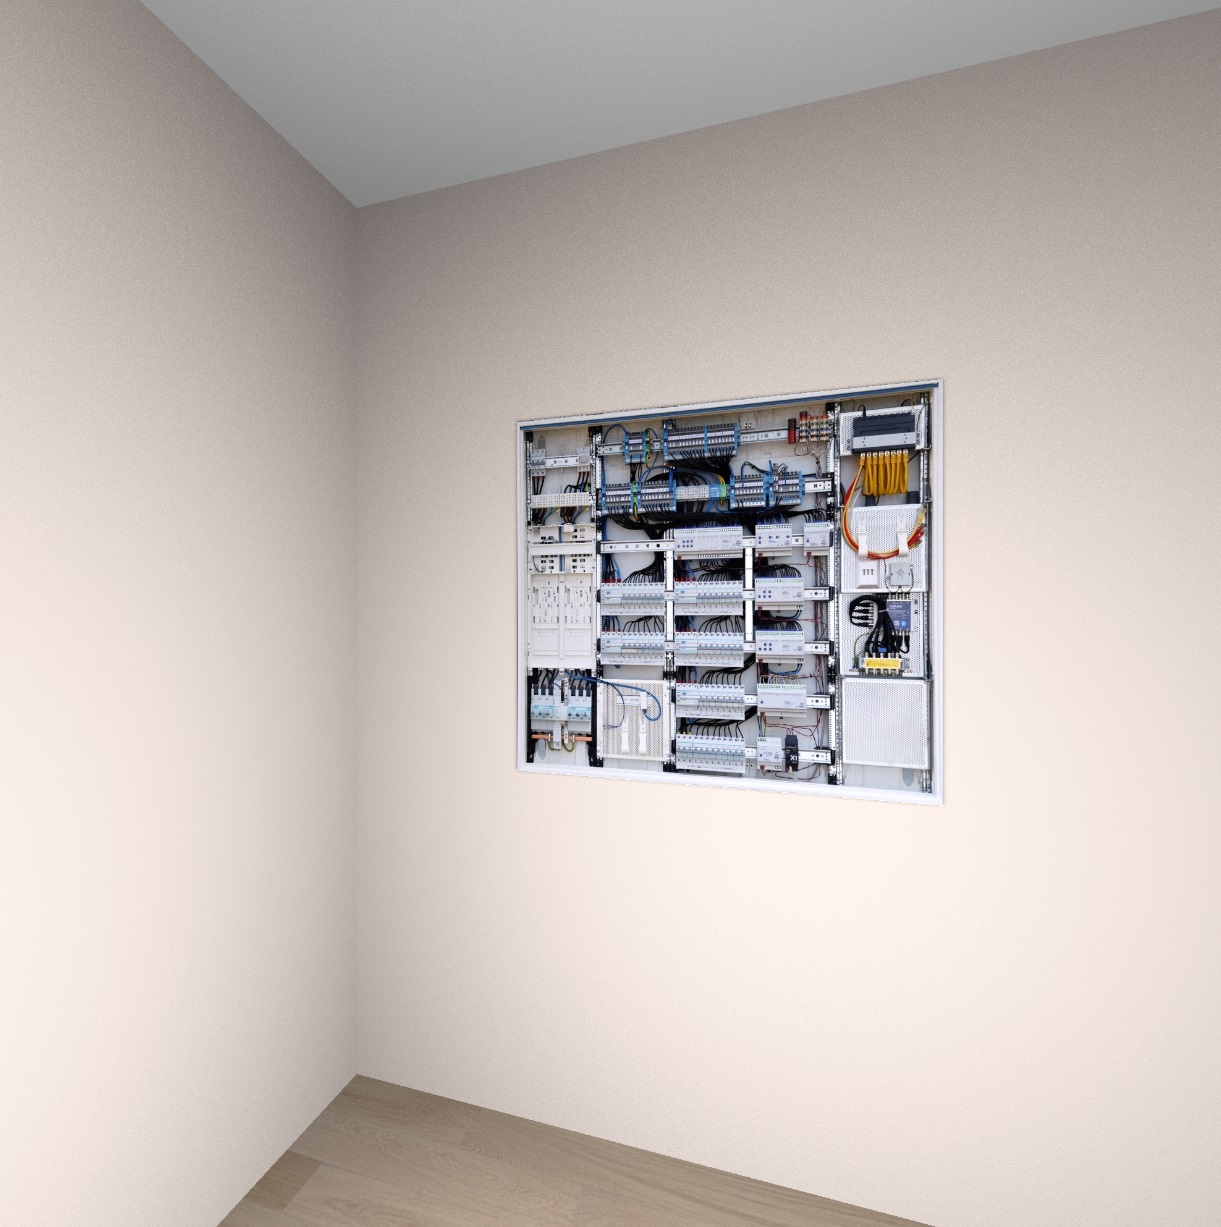
Stromzählerkasten Hallo, ich suche für mein Projekt einen Stromzählerkasten zum einfügen. Hat einer sowas gratis? Beispielbild: https://www.directupload.eu/file/d/8582/m5g8smch_jpg.htm |
| Posted by Keet at Jun 11, 2024, 4:18:46 PM |
|
Re: Stromzählerkasten Sie haben ein perfektes Bild der Vorderseite, so dass Sie die Größe eines Kastens ändern und das Bild als Vorderseitentextur des Kastens festlegen können. Nicht ein echter Schrank, aber bis Sie etwas Besseres finden, haben Sie etwas, mit dem Sie arbeiten können. Es wird nicht einfach sein, einen solchen Schrank zu finden, vielleicht etwas, das ihm sehr ähnlich ist. Und wenn Sie Glück haben, sogar umsonst. [English] You have a perfect image of the front so you could resize a box and set the image as the front texture of the box. Not a real cabinet but until you find something better you have something to work with. It will not be easy to find such a cabinet, maybe something that closely resembles it. And if you are lucky for free. ---------------------------------------- Dodecagon.nl 1300+ 3D models, manuals, and projects |
| Posted by wdvs.profi at Jun 11, 2024, 9:56:05 PM |
|
Re: Stromzählerkasten Hallo und Danke erstmal für die Antwort. Ich habe ihren Vorschlag schon ausprobiert, aber ich kann das File zwar einfügen und bearbeiten, aber Sweethome speichert es nicht ab. Hello and thank you for your answer. I have already tried your suggestion, but although I can insert and edit the file, Sweethome does not save it. Greetings to the Dutch and thx a lot. |
| Posted by GaudiGalopin3324 at Jun 11, 2024, 11:06:41 PM |
|
Re: Stromzählerkasten Guten Tag. Sie müssen versuchen, diesen Schrank nach der Keet-Methode zu machen, dies ist der beste Weg. Dies ist ein Schrank in einer Nische von 7 Reihen, seine Abmessungen sind ungefähr 110x120 cm. Sie müssen das vorbereitete Bild als Textur speichern, Ihr Foto passt hervorragend, schneiden Sie es an der Außenkante des Schranks ab. Oder hier herunterladen. Machen Sie eine Box von 110x120x1 cm, legen Sie die Textur des Fotos auf die Vorderseite, die anderen Seiten sind weiß. https://www.mediafire.com/view/ubpsd5g0cyblve...0%25B0%25D1%2584.jpg/file |
| Posted by GaudiGalopin3324 at Jun 11, 2024, 11:33:27 PM |
|
Re: Stromzählerkasten |
| Posted by wdvs.profi at Jun 12, 2024, 11:38:18 AM |
|
Re: Stromzählerkasten Wow, how ist this Way easy....Cool. Thx Mate, you welcome. now i know this, work is much easier  I show you the result. Thx a lot to you and Mr. keet. https://www.directupload.eu/file/d/8583/n4833v3g_png.htm |
| Posted by GaudiGalopin3324 at Jun 12, 2024, 8:09:18 PM |
|
Re: Stromzählerkasten Es hat gut geklappt! Ich rate Ihnen, diese Methode von Fotos öfter auf Kisten anzuwenden. Eine große Anzahl von Dingen im Haus ähnelt entweder Rechtecken oder Kreisen. All dies kann nicht mit komplexen Modellen, sondern mit Kisten und Zylindern erfolgen. Zum Beispiel hat hier auf dem Bild c gezeigt, was getan werden kann. Die Tür!! Irgendjemand von Design, jetzt müssen Sie nicht nach ähnlichem suchen. Es gibt Hunderte von Fotos. Schalter und Steckdosen!!!)) - Sie müssen nur die gewünschte Farbe auf der Website des Shops finden und das beschnittene Foto als Textur speichern. Die Box misst 8,2 cm x 8,2 cm x 1 cm. Die BILDER im Rahmen sind alle!! All dies wird perfekt auf die Boxen geklebt. Runde Ventilatoren und Uhren aller Art. Es ist notwendig, einen Zylinder mit dem gewünschten Durchmesser und einer Höhe von 0,5-1cm zu machen und um die X-Achse um 270 zu drehen. All dies wiegt nichts und lädt sehr schnell. Und natürlich müssen Sie ein echtes Modell zum Dekorieren einfügen)). Bücher, Schilder. Alles kann auf Kisten gemacht werden. 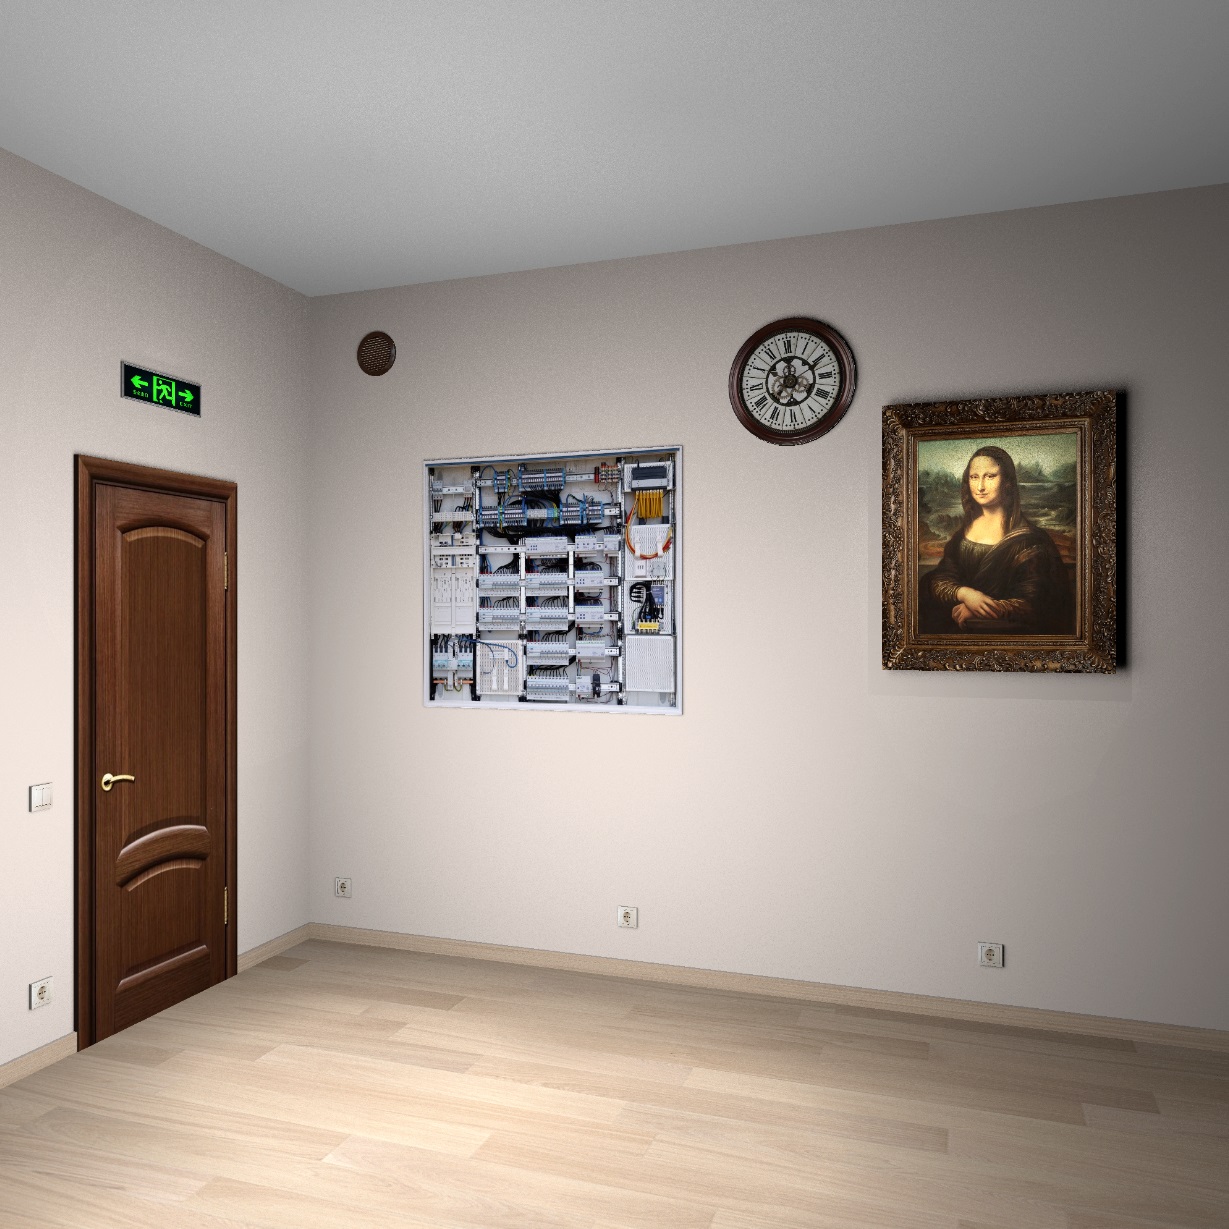 |
| Posted by Keet at Jun 12, 2024, 8:33:41 PM |
|
Re: Stromzählerkasten Nehmen Sie diesen Rat von GaudiGalopin3324 als Evangelium. Er ist der absolute Meister der Verwendung von Bildern auf Kisten als Ersatz für Möbel, für die es keine 3D-Modelle gibt. Hier ist nur eines seiner hervorragenden Beispiele für die Verwendung von Bildern auf ansonsten unsichtbaren Kisten: https://sweethome3d.com/support/forum/viewthread_thread,12648_offset,160#62349 Es ist ein sehr langer Thread, aus dem dieses Beispiel stammt, aber es ist einer der unterhaltsamsten Threads im Forum, in dem man eine Menge spezieller Techniken lernen kann, die die Möglichkeiten von Sweet Home 3D bis an die Grenzen ausreizen. [English] Take that advise from GaudiGalopin3324 as gospel. He is the absolute master of using images on boxes as a replacement for furniture for which there are no 3D models available. Here is just one of his excellent examples of using images on otherwise invisible boxes: https://sweethome3d.com/support/forum/viewthread_thread,12648_offset,160#62349 It's a very long thread where that example comes from but it is one of the most entertaining threads on the forum where you can learn a lot of special techniques that take the capabilities of Sweet Home 3D over the limit. ---------------------------------------- Dodecagon.nl 1300+ 3D models, manuals, and projects |
| Posted by GaudiGalopin3324 at Jun 12, 2024, 8:44:45 PM |
|
Re: Stromzählerkasten Lieber Keet, Sie haben mich dazu gebracht, eine geizige männliche Träne zu brechen.. Danke!  |
| Posted by wdvs.profi at Jun 13, 2024, 2:57:40 PM |
|
Re: Stromzählerkasten Wow, GaudiGalopin3324 is not a Advanced Member, he is a Master of Art. Nun, da ich soviel gelernt habe, versuche ich es auch anzuwenden. Eine Frage noch an die Profis: Wenn ich Texturen in den Ordner- Textures oder Furniture kopiere und in der Mobilarauswahl dann auf Mobiliar gehe,Texturbibiliothek importieren anklicke, kann ich zwar die texturen importieren, z.B. eteksScopia.sh3t, aber ich finde sie in den Texturen nicht. Was mache ich falsch? Ich wollte einen Raum mit Teppich auslegen, aber statt der Raumgröße von 50 qm bekomme ich nur viele kleine Teppiche aneinander gereiht....Ich versuch mal den Kastentrick. xxxxxxgoogle-Translatexxxxxxxx One more question for the pros: If I copy textures into the folder Textures or Furniture and then go to Furniture in the furniture selection and click Import texture library, I can import the textures, e.g. eteksScopia.sh3t, but I can't find them in the textures. What am I doing wrong? I wanted to carpet a room, but instead of the room size of 50 square meters, I only get lots of small carpets lined up one after the other... I'll try the box trick. Danke, Thx, and have a nice day. |
| Posted by Keet at Jun 14, 2024, 7:09:34 AM |
|
Re: Stromzählerkasten Ich wollte einen Raum mit Teppich auslegen, aber statt der Raumgröße von 50 qm bekomme ich nur viele kleine Teppiche aneinander gereiht... So soll es auch funktionieren. Im Allgemeinen gibt es zwei Arten von Texturen: nahtlose und nicht nahtlose. Für einen Fußboden benötigen Sie normalerweise eine nahtlose Textur. Die Textur für einen Fliesenboden besteht aus einer einzigen nahtlosen Fliese, die wiederholt wird, um einen vollständig gefliesten Boden zu schaffen. Dasselbe gilt für einen Teppichboden. Nahtlos bedeutet, dass die Bilder auf zwei benachbarten Fliesen ineinander übergehen, ohne dass eine Naht zu sehen ist. Daher auch der Begriff "nahtlos".Wenn Sie viele kleine Quadrate erkennen können, haben Sie entweder eine nicht nahtlose Textur verwendet oder die Textur soll so aussehen. (Eine nahtlose Fliesentextur hat z. B. einen winzigen Rand, um die Fugen zwischen den Fliesen darzustellen, aber die Verbindungsfugen sehen aus wie eine einzige Fuge). Bei nicht nahtlosen Texturen handelt es sich in der Regel um ein einziges Bild für die gesamte Oberfläche der Seite des Objekts auf die es angewendet wird. Die Schalttafel und die Vögel sind solche Beispiele. Für Ihren Teppichboden benötigen Sie eine nahtlose Teppichtextur. Diese füllt den Boden aus und sieht aus wie ein einzelner Teppich. Nach dem Auftragen einer Textur können Sie den Maßstab der Textur anpassen. In seltenen Fällen müssen Sie auf 1% oder 10000% skalieren, aber die Originaltexturen von Sweet Home 3D und Scopia sollten mit dem Standardmaßstab von 100% funktionieren. Übersetzt mit DeepL.com (kostenlose Version) [English] That is how it is supposed to work. Generally there are two types of textures: seamless and not seamless. For a floor you usually want a seamless texture. The way it works is that the texture for a tile floor is a single seamless tile that is repeated to create a fully tiles floor. The same for a carpeted floor. Seamless means that two the images on two adjacent tiles flow from one into the other without showing a seam. Hence the term 'seamless'. If you can recognize many little squares you either used a non-seamless texture or the texture is supposed to look that way. (For example a seamless tile texture will have a tiny border to represent the grout between tiles but the connecting grouts will look like a single grout.) Non-seamless textures are generally meant to be a single image for the full surface of the side of the object where it is applied too. The switchboard and the birds are such examples. For your carpeted floor you need a seamless carpet texture. Using that will fill the floor and looks like a single carpet. After applying a texture you can adjust the scale of the texture. In rare cases you have to scale to 1% or 10000% but the original textures from Sweet Home 3D and Scopia should work at the default 100% scale. ---------------------------------------- Dodecagon.nl 1300+ 3D models, manuals, and projects |
| Posted by wdvs.profi at Jun 14, 2024, 12:45:24 PM |
|
Re: Stromzählerkasten google says: After using your help, I have now gone from working in the office to working in a workshop on my own. I'm still far from being a professional, but thanks to you I've been working on it for 12 hours straight. I never thought that something like this could be so great. You made my day. Thank you very much. |
| Posted by GaudiGalopin3324 at Jun 14, 2024, 9:05:59 PM |
|
Re: Stromzählerkasten my belief is that for realistic visualizations it is better to do the whole room with the help of boxes. I make everything with boxes - windows, doors, furniture, carpets, tables, parquet, tiles, wallpaper, window sills, kitchen. Boxes have a great advantage over creating walls and floor surfaces in rooms. There you can set textures more correctly, assign a color, and change the scale of the texture. First, I draw everything in AutoCAD, set all the dimensions, then spend half an hour accurately reproducing the room with the help of boxes. I also always make the floors in thin boxes of 0.1-0.3 cm. If there is a boundary between two types of materials, I just make the desired box 1mm higher and overlay it on a lower box with a different texture. Unless, of course, the boundaries of the coatings are straight. This type of coating (texture) overlaps another coating and a clear boundary is obtained, a difference of 1 mm is not visible to the eye. All furniture, especially in a modern rectangular design, can be made using boxes. To do this, cabinets need to be drawn and sized, then create boxes in large blocks and connect them into tiers with small gaps of 3mm-5mm (accurately give each tier an excess above the floor, align with a tool in the Furniture column, there is an excellent alignment tool in different directions. The first selected element is a sample, the rest selected after it will be aligned with it.). Tiling, especially if there are inserts from decors, can also be done using boxes of real tile size, 2cm high (these are really tiles and glue), and the tile texture can be placed on the TOP. Then copy a lot of these boxes, put them in rows, align, compose a composition in the size of the wall, a little more, select and import into OBJ, then export back with a rotation of 270 relative to the X axis. You will get a realistic facing with the right tiles, without distortion. I try to find tiles with different patterns on factory websites so that the adjacent tiles look like real ones, without repeating the pattern. Usually there are 5-8 FACES in the collection with a different type of drawing. I save them all as textures numbered 1-2-3... and apply them randomly, rotate the textures of the box all the time, change the mirror image. This removes the bad look of the finish with a rough repetition of the pattern, the cladding turns out to be real, lively, realistic. It is best to assign the texture to the sides of the box individually. Not the general texture for the whole box. Then there will be no diagonal distortion of the texture on the sides of the box. Dear Keet advises making the sides of the boxes invisible to the eye in the settings, so the size of the entire model and the rendering time are reduced. It's a good way. It is also better to make the ceiling as a box at the right height, white in color. This way of creating a room using boxes certainly does not allow you to leave the room and look at it from the outside. There will be horror outside. But this method is better for interior visualization. And with skill, it is not inferior to 3DS MAX in any way))). It's all out of the boxes here. The real models are a chandelier, an armchair, a door handle, pillows, a laptop. Models are very necessary, they add three-dimensional reality to the interior, but the boxes weigh much less, it all depends only on the size of the texture. I always try to upload the highest quality JPEG for the texture and do not reduce the size. Otherwise, it will not be so good in the end on the render. Although, of course, it takes longer to load.  the parquet on the TOP box is 300x300x0.1 cm, the squares are connected in a group of 6 pieces, the parquet goes beyond the boundaries of the room strongly, but does not distort in proportions on the render, the laying of the "French tree" turns out to be realistic. Sorry for the probably strange translation of the parquet laying method. We call it that). |
| Posted by Keet at Jun 14, 2024, 10:01:02 PM |
|
Re: Stromzählerkasten Sorry for the probably strange translation of the parquet laying method. We call it that. It's called a Herringbone Pattern.German: Fishgrätenmuster Dutch: Visgraat patroon French: Motif à chevrons ---------------------------------------- Dodecagon.nl 1300+ 3D models, manuals, and projects |
| Posted by wdvs.profi at Jun 15, 2024, 12:27:57 AM |
|
Re: Stromzählerkasten sorry for the further disruption. after I successfully inserted the electricity meter and a carpet as a printable box as you explained, it doesn't work with the new two jpg-images. I can't get it to work. size is original and reduced. where am I going wrong? https://www.directupload.eu/file/d/8586/awdw9dob_jpg.htm https://www.directupload.eu/file/d/8586/cmh3m73t_jpg.htm |
| Posted by GaudiGalopin3324 at Jun 15, 2024, 7:12:28 AM |
|
Re: Stromzählerkasten [moderated: Andrei, I don’t mind multi language threads but posting in Russian in a thread initially written in German might become too much!] |
| Posted by GaudiGalopin3324 at Jun 15, 2024, 6:50:08 PM |
|
Re: Stromzählerkasten Ich bitte um Entschuldigung. Ich habe versehentlich keine Übersetzung veröffentlicht. Korrigiere. Bitte sagen Sie mir, was haben Sie nicht geschafft? Was wollten Sie am Ende bekommen? Wie wollten Sie diese Möbelbilder verwenden? |
| Posted by wdvs.profi at Jun 15, 2024, 7:50:27 PM |
|
Re: Stromzählerkasten Hello, thats no problem. My problem is, i want to put this pics on the texturable Box, but no matter what i try, it doesent work. so i think, its maybe a error with the Pics? With the other 2 it works fine. can you please watch this pics and tell me, if they are good or not. https://www.directupload.eu/file/d/8586/kpd3n8st_jpg.htm https://www.directupload.eu/file/d/8586/vsih5kmh_jpg.htm thx a lot. |
| Posted by GaudiGalopin3324 at Jun 15, 2024, 10:19:57 PM |
 Re: Stromzählerkasten
Die Bilder sind sehr, sehr gut. Sie können mit ihnen arbeiten. Aber es ist viel komplizierter als nur ein Foto auf einer Schachtel. Jetzt werde ich alles im Detail erzählen. Hier ist ein solches Bild, das Sie erhalten können.  sie müssen einen Online-Editor herunterladen, ich rate Photoshop mit vereinfachten Funktionen. In diesem Editor müssen Sie den gesamten Hintergrund um den Tisch und den Stuhl transparent machen. Auf Ihren Fotos ist alles perfekt vorbereitet - der Hintergrund ist weiß. Sie müssen mit dem Zauberstab-Werkzeug im Editor arbeiten - markieren Sie das weiße Feld und dann die Schaltfläche "Löschen". Es sollte ein solches Bild erhalten. Die Hälfte der Arbeit ist erledigt. Und es dauert 3 Minuten. 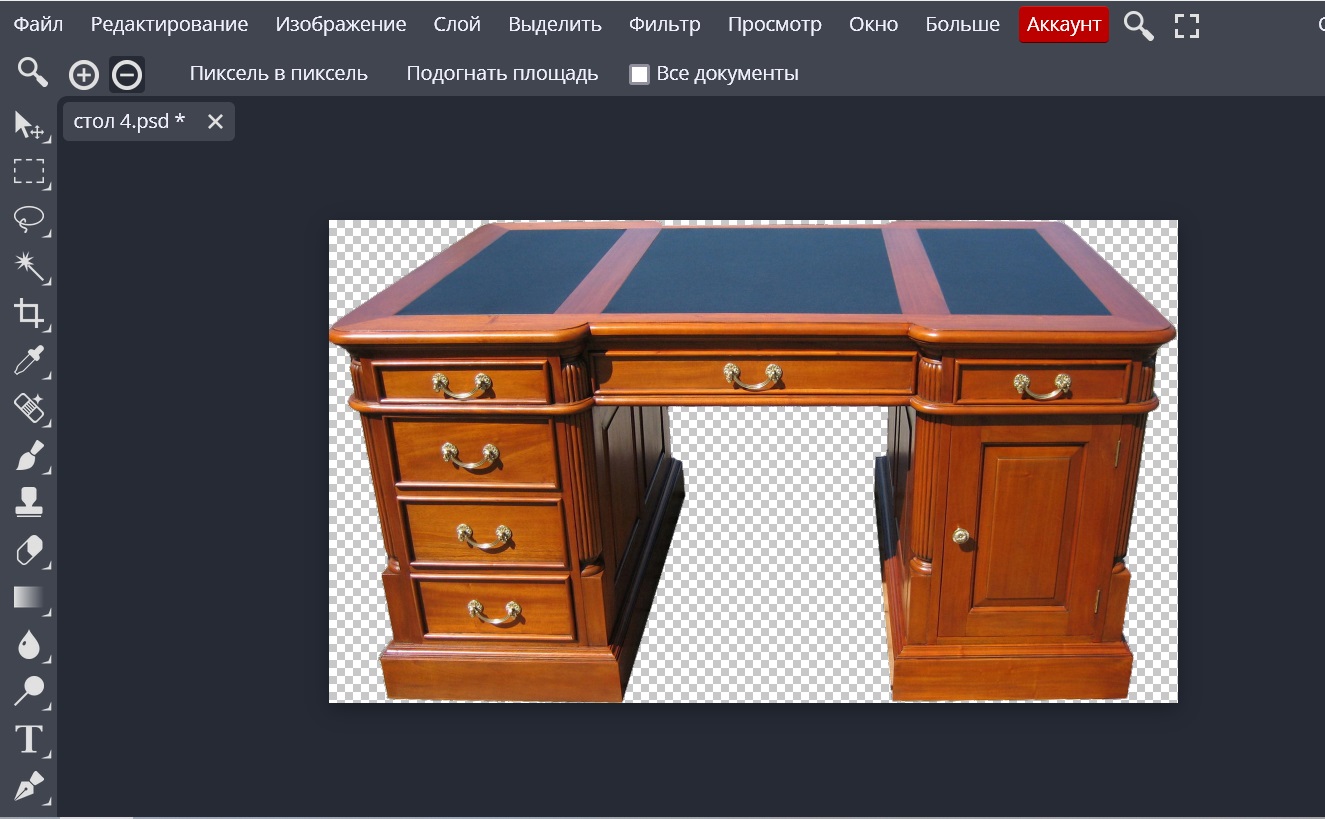 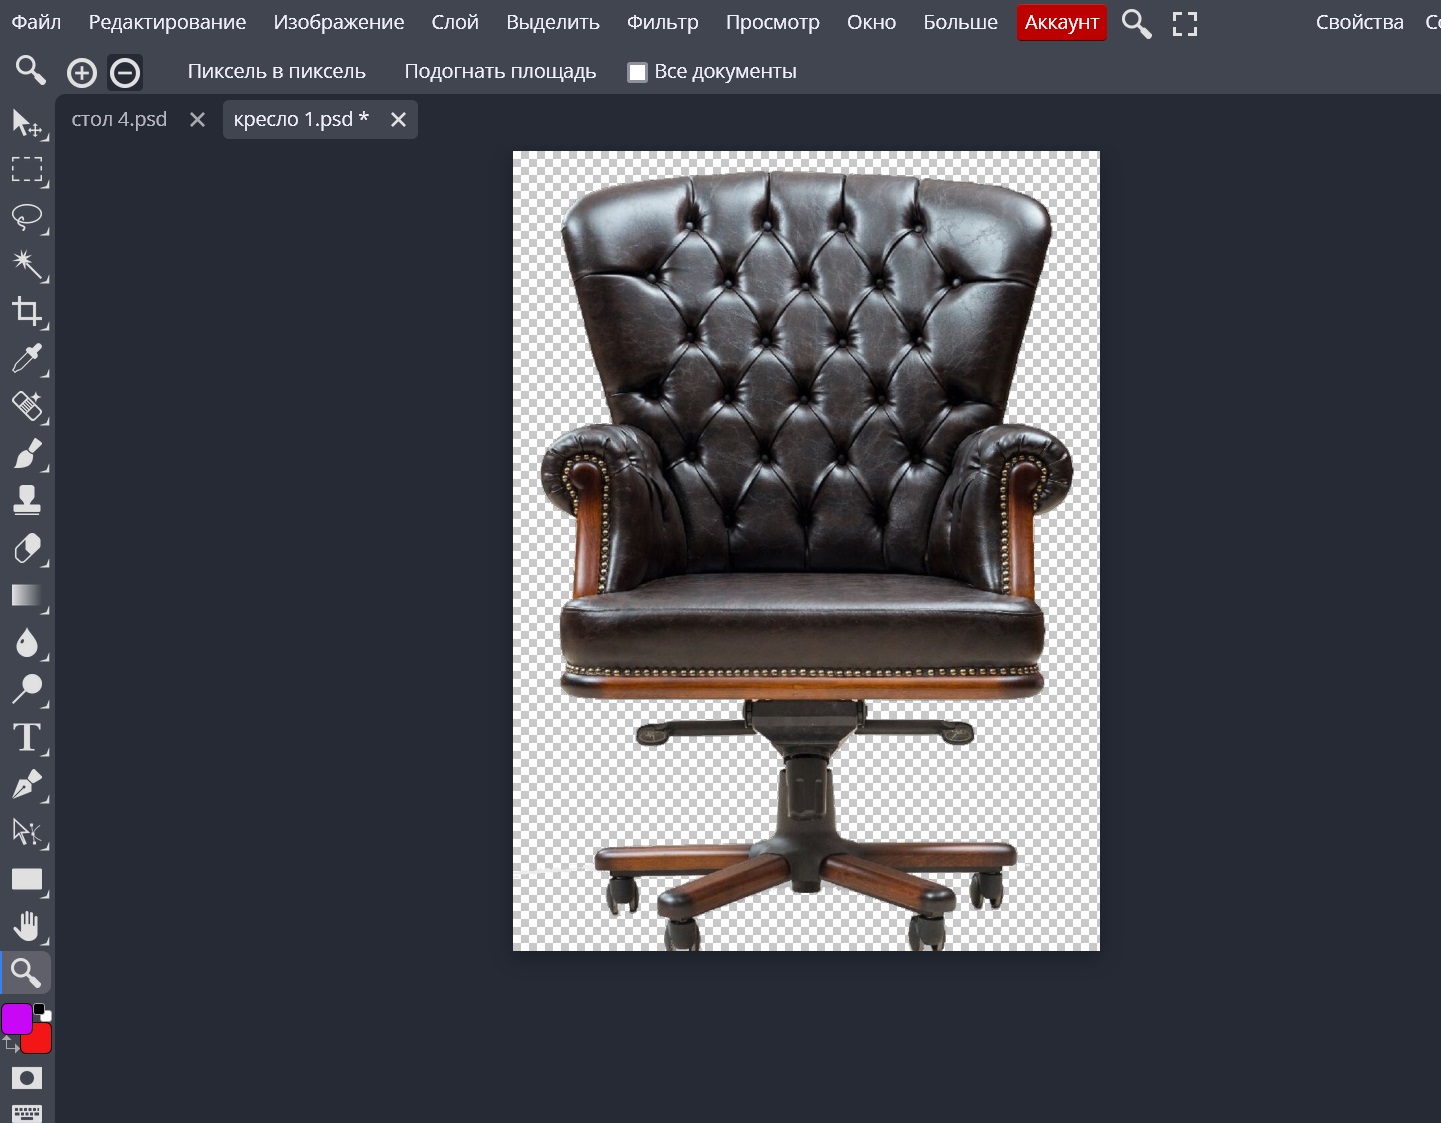 sie müssen diese Bilder auf einem transparenten Hintergrund im PNG-Format speichern. Es ist wichtig, die Breite und Höhe in Pixeln im Titel beizubehalten, dies wird dann benötigt. Jetzt beginnt das Schwierigste. Sie müssen eine Box mit Breite und Höhe wie im Titel erstellen. Der Tisch (Bild) ist zum Beispiel 1698cm breit und 966 cm hoch. Die Tiefe der Box beträgt 5 cm. Stellen Sie dann die Proportionen der Box auf 90cm ein, alle anderen Maße werden proportional reduziert. Legen Sie das PNG-Bild auf die Vorderseite der Box, alle anderen Seiten sind unsichtbar. legen Sie die Schachtel mit dem Bild des Tisches an der richtigen Stelle in den Raum. Der Tisch wird schrecklich aussehen. Die Kurve, die nicht wie eine echte aussieht, ist auf der Seite übersät. Parodie. Verzweifeln Sie nicht. Es gibt zwei magische Räder, um die Box zu steuern. Drehen Sie zuerst die Box mit dem Rad Nummer 1, Sie müssen das Bild so einstellen, dass die Oberseite der Tischplatte parallel zu den horizontalen Linien im Raum nebeneinander verläuft, es gibt viele dieser Linien. Die Kante des Schaltschranks, die untere Kante des Musters, die Sockelleiste. 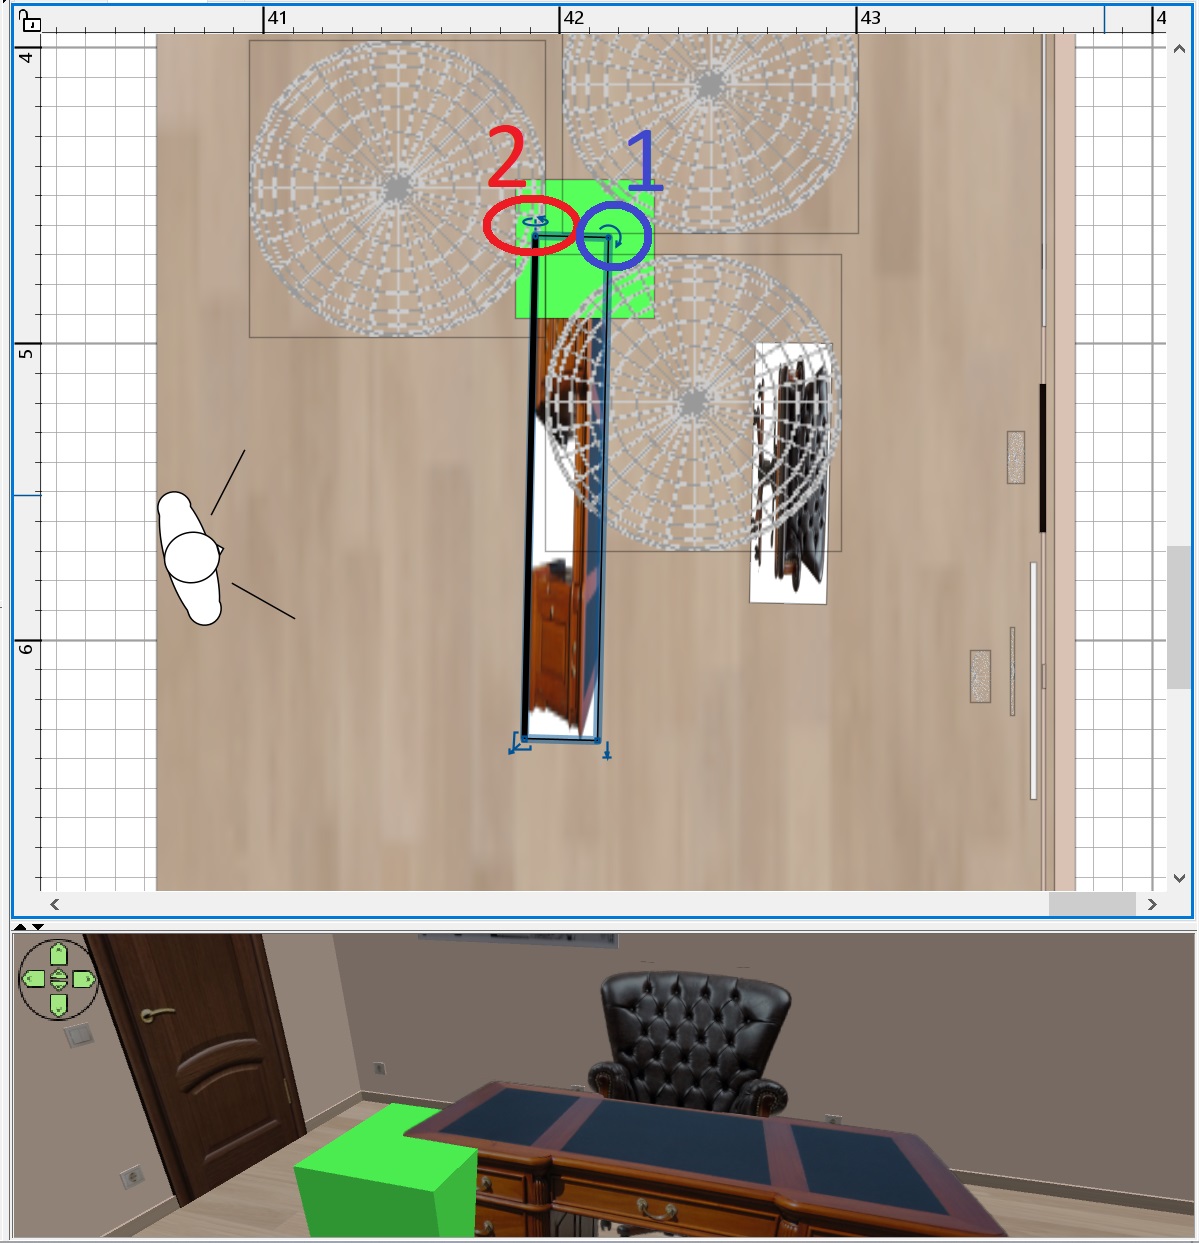 drehen Sie nun mit dem Rad 2 (drehen Sie zuerst die Box mit den Einstellungen, legen Sie 20 auf die X-Achse, und dieses Rad erscheint) die Box so, dass die nächsten vertikalen Linien parallel zu den Linien des Tisches erscheinen. Es ist ein komplexer Prozess. Leider arbeiten wir jetzt nicht mit Modellen, bei denen alles automatisch funktioniert, sondern mit einer ILLUSION. Gedulden. Wenn alles richtig erscheint, legen Sie eine Schachtel mit einer Höhe von 78 cm neben den Tisch, eine hellgrüne Vorlage, genau in dieser Höhe, in der Regel alle Schreibtische. Etwa. Ziehen Sie die Schachtel mit dem Höhenpfeil auf der Schachtel heraus, so dass das Muster mit der Oberseite der Tischplatte auf dem Foto übereinstimmt. 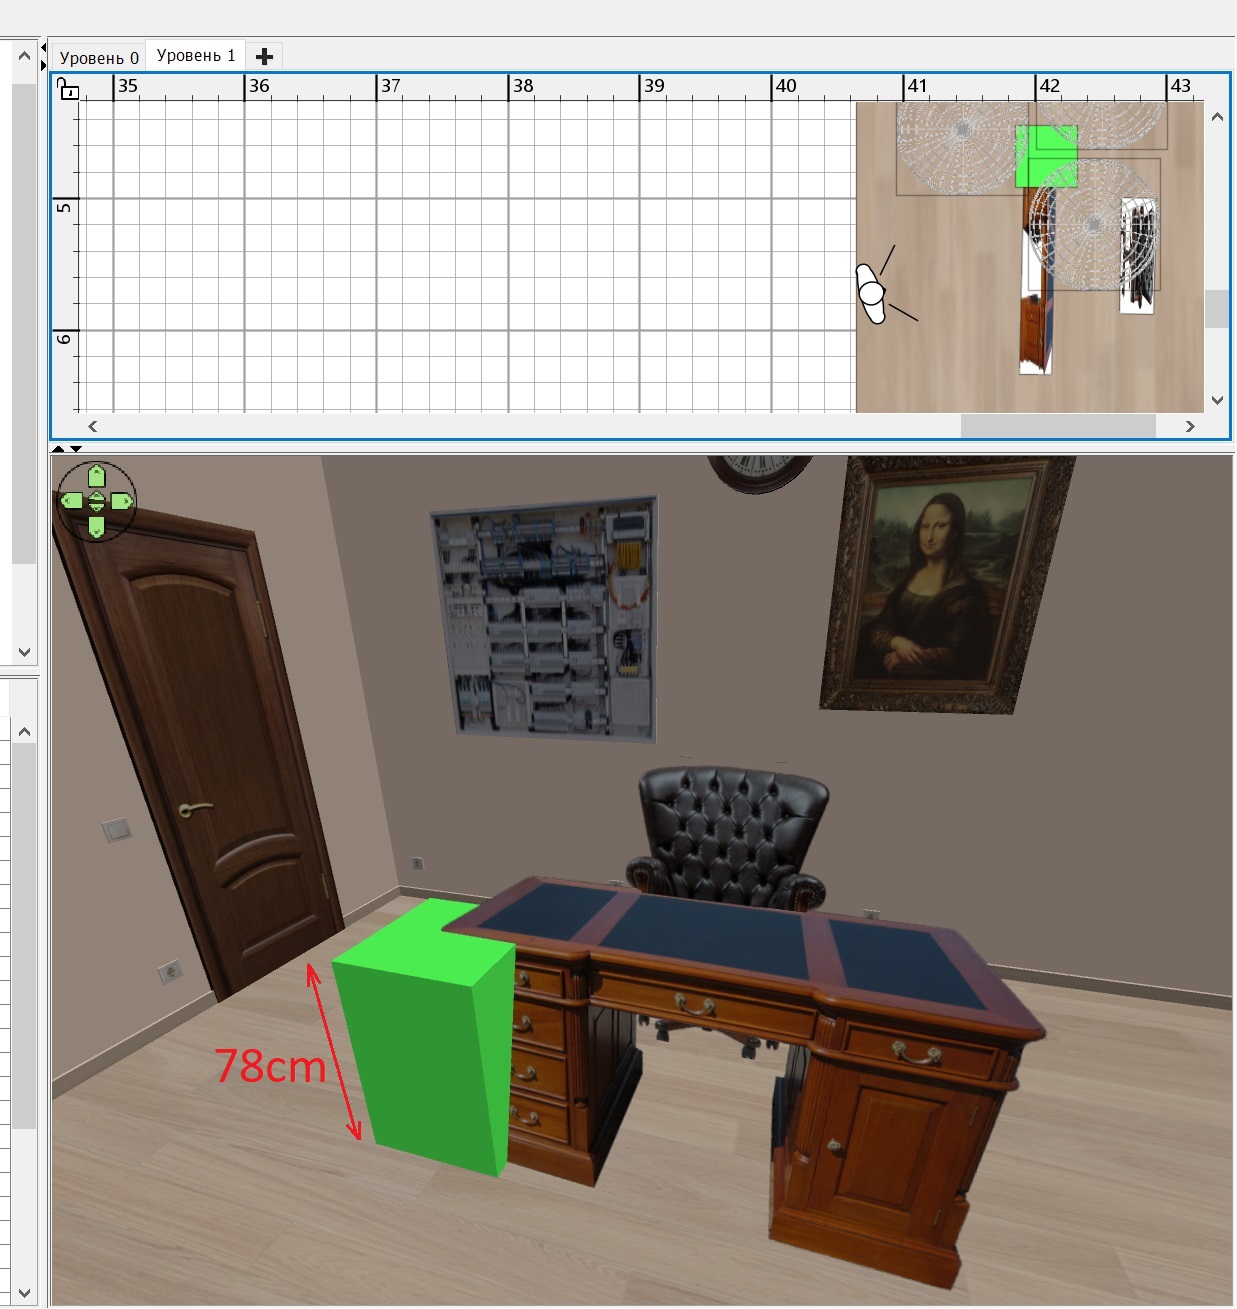 mit einem Stuhl auch. Die Höhe des Stuhls beträgt etwa 100 cm, passen Sie die Box nach 100 cm Muster an. Diese Art des Bildes auf einer unsichtbaren Box wurde von einem angesehenen Keet vorgeschlagen. Es ist ein genialer Weg, keine Modelle zu suchen. Es hat natürlich einen sehr großen Nachteil. Man kann den Tisch nicht aus einer anderen Perspektive betrachten. Das Foto diktiert die Position des Betrachters. Aber es ist besser, als überhaupt kein 3D-Modell zu finden. |
| Posted by wdvs.profi at Jun 16, 2024, 12:14:50 PM |
|
Re: Stromzählerkasten wow wow wow. OMG. Oh mein Gott, das wird wohl bei mir nie etwas. OK, dann backen wir kleinere Brötchen ( vielleicht Donuts). Ich teste seit Stunden das Bildprogram ACDSee und bekomme den Tisch nicht frei. Photoshop getestet, selbes Problem. Ist wohl eher was für Profis, wozu ich nicht zähle. Ich habe nach Stundenlanger suche einen Tisch und Sessel gefunden, welcher mir als Hilfe zusagt. Deswegen nochmals vielen Dank für eure Mühe und Hilfe. Nick. Jetzt muss ich nur noch herausfinden, wie die Texturen aus dem DL Bereich einzeln angezeigt werden, da sie nach dem Importieren der Texturbibliothek nicht existieren. Aber das wird sicher einfacher. XXXXXXXXXXXXXXXXXXXXXXXXXXXXXXXXXXXXXXXXXXXXXXXXXXXXXXXXXXXXXXXXXXXXXX wow wow wow. OMG. Oh my God, I'll probably never be able to do that. OK, then we'll bake smaller bread (maybe donuts). I've been testing the image program ACDSee for hours and can't get the table free. Tried Photoshop, same problem. That's probably more for professionals, which I'm not one of yet. After hours of searching, I found a table and chair that I like. So once again, thank you very much for your effort and help. Nick. Now I just have to figure out how to display the textures from the DL area individually, since they don't exist after importing the texture library. But that will definitely get easier. So @ all, Have a nice Day. |
| Posted by GaudiGalopin3324 at Jun 17, 2024, 9:18:05 AM |
|
Re: Stromzählerkasten Es ist nicht so schlimm!)) Ich möchte immer noch zeigen, dass es möglich ist, der Illusion eines Tisches echte Gegenstände hinzuzufügen, als ob sie auf diesem Tisch stehen. Zuerst habe ich für den Betrachter die Kopfneigung auf 0 gesetzt und mit dem Rad Nummer 2 die Vertikale am Tisch ausgerichtet. So richtig, so fotografieren alle Innenfotografen das Interieur. Neigung der Kamera ist 0. Jetzt ist der Tisch ohne vertikale perspektivische Verzerrung und alle Gegenstände im Raum ohne vertikale perspektivische Verzerrung. Ich nahm die Vase und legte sie knapp vor die Box, hob sie mit dem Höhenpfeil ein wenig an, damit der Betrachter die Vase auf dem Tisch sehen kann (das ist eine Illusion!). Das gleiche habe ich mit einer Schreibtischlampe gemacht. Und jetzt das Wichtigste. Mit einer kleinen, flachen und länglichen Halbkugel-einer Leuchte mit einer Leistung von 10% - beleuchtete ich das BILD der Tischplatte auf der Box. Die Halbkugel ist um 25 Grad an der Y-Achse gedreht und scheint in Richtung der Box. Aber es scheint, dass die Lampe auf dem Tisch steht und den Tisch beleuchtet! Das ist natürlich eine Täuschung, aber alles sieht wahr aus. 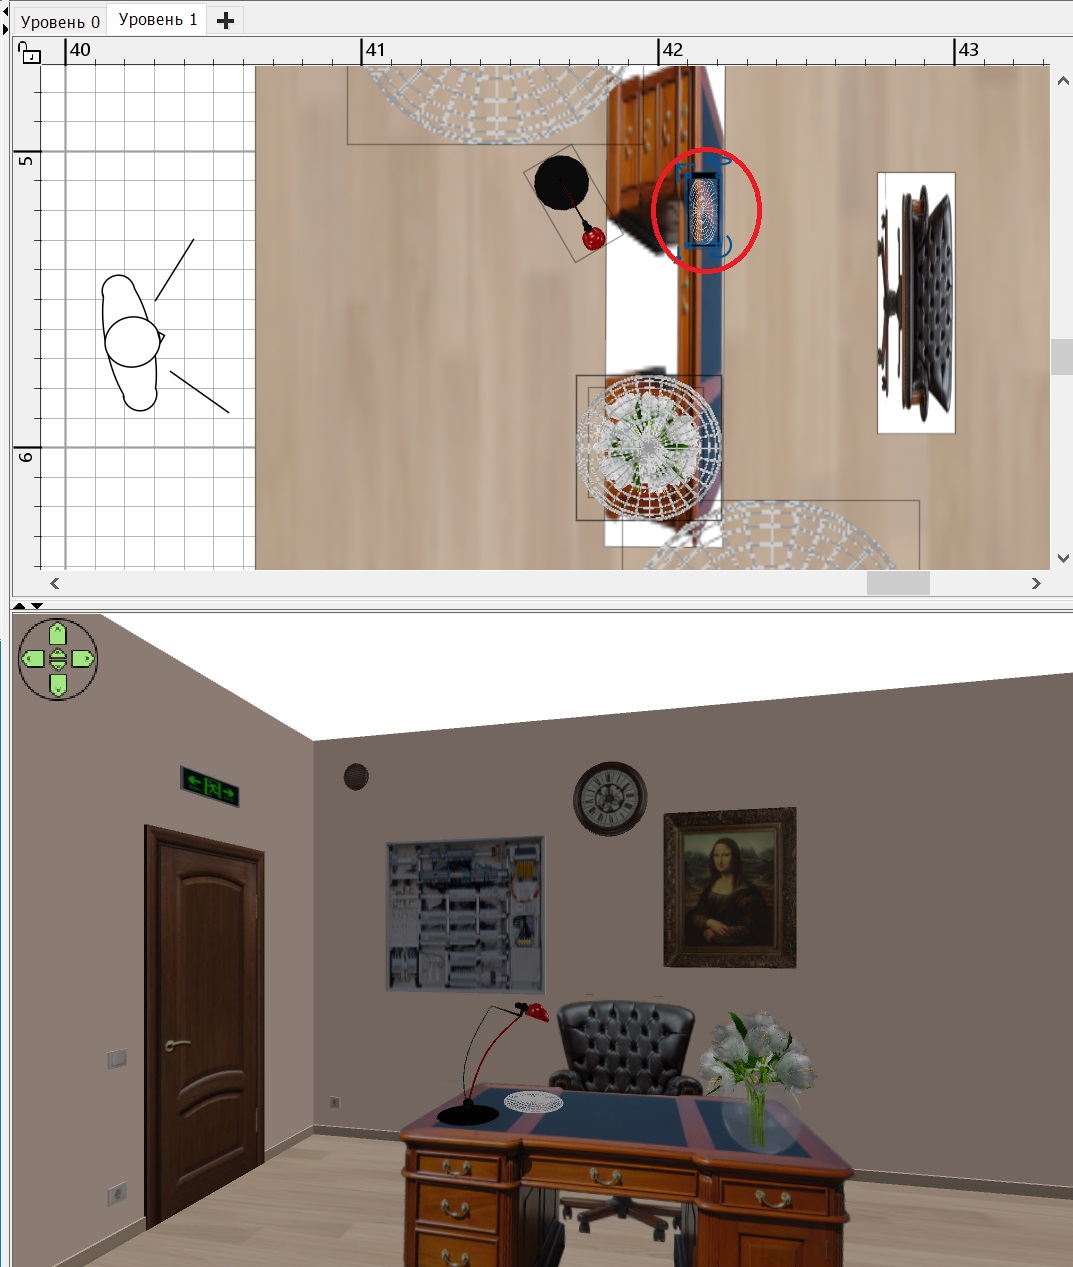 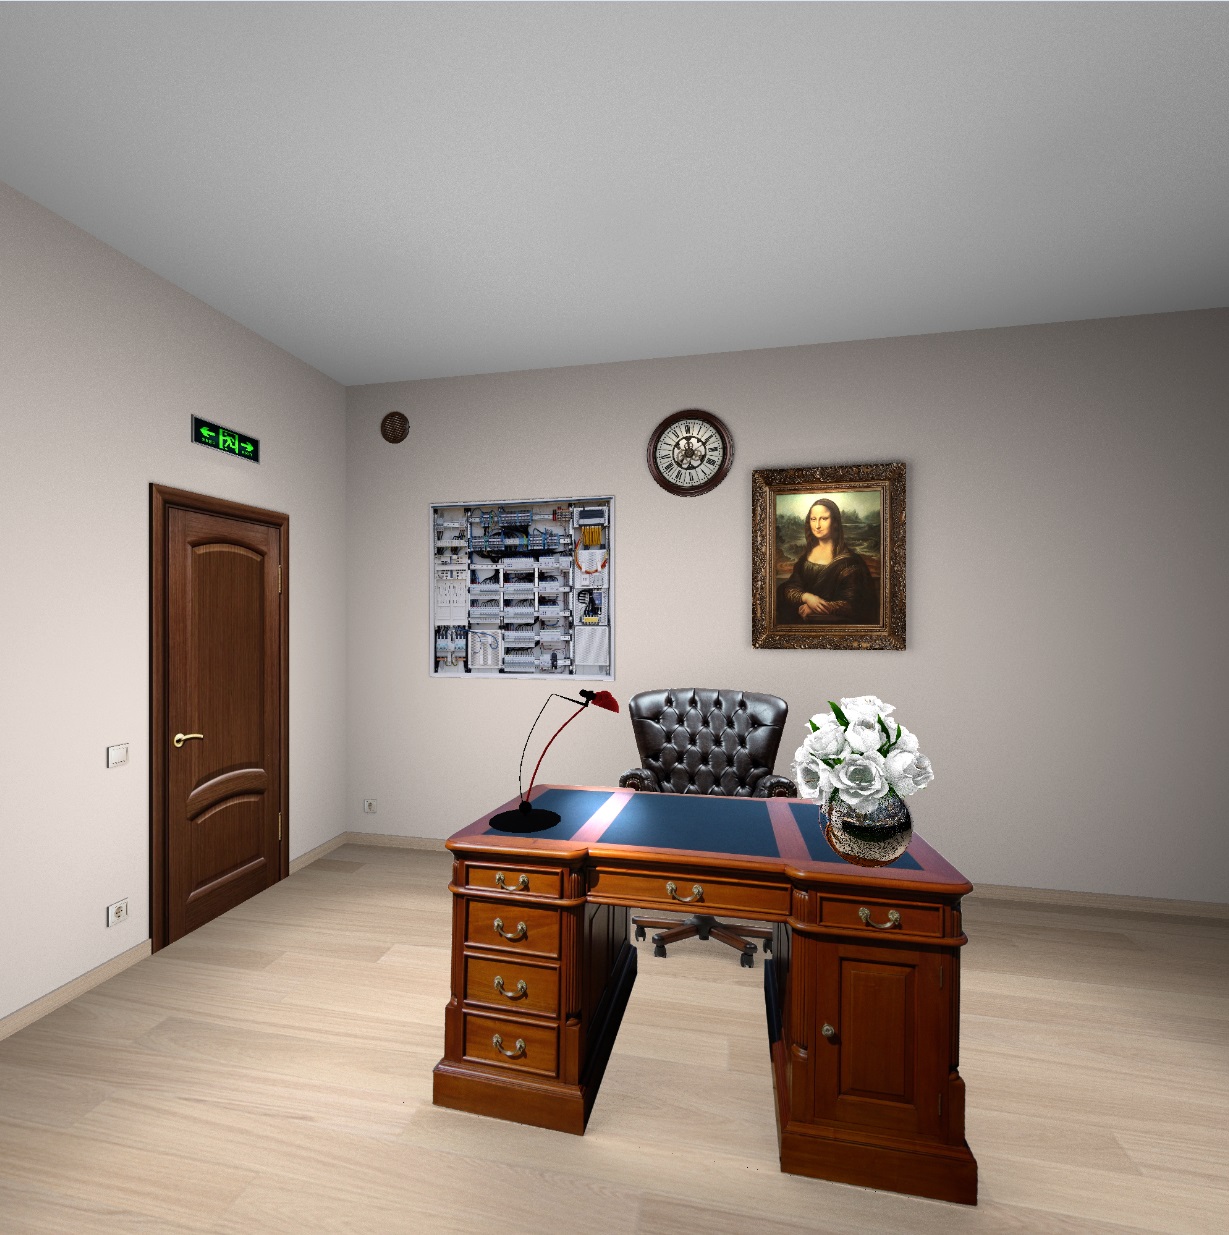 |
| Posted by GaudiGalopin3324 at Jun 18, 2024, 6:28:26 PM |
|
Re: Stromzählerkasten Die Illusion sieht so aus. https://www.mediafire.com/file/3m7h6ksnabxsyi...5B8%25D1%2582_Q1.mov/file |
|
|
Current timezone is GMT Jun 25, 2026, 2:25:53 AM |