|
Sweet Home 3D Forum » List all forums » » Forum: Features use and tips » » » Thread: Guide To Creating A Flat Roof With Cut Outs For Skylights |
|
| Print at Dec 20, 2025, 6:43:49 AM | |
| Posted by Jonnie63 at Apr 15, 2019, 3:59:32 PM |
|
Guide To Creating A Flat Roof With Cut Outs For Skylights I finally found a way to create flat roofs in my model with cut-outs for skylights that I found in tune with my workflow. I thought I would create a thread and add the steps one at a time with the hope that it might eventually end up in the tips and tricks section. Other posts will follow - this is the first. 
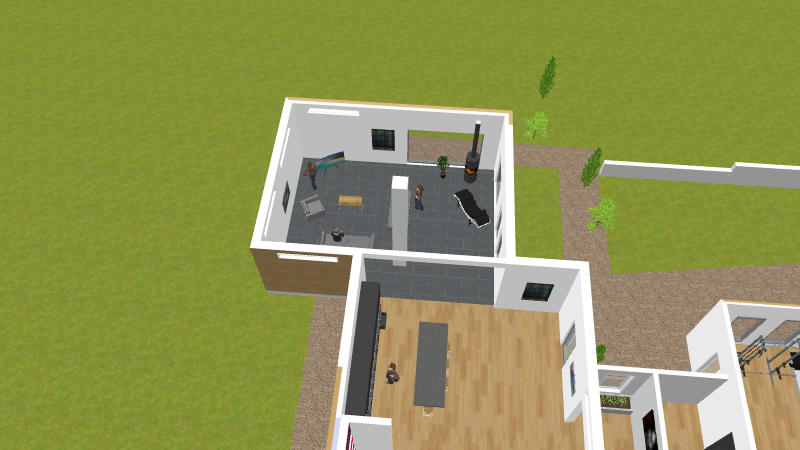
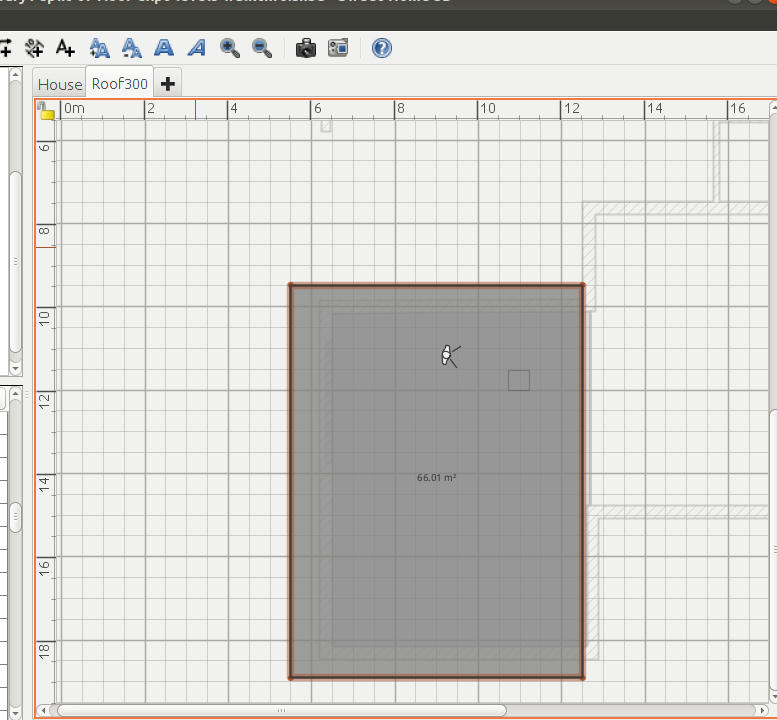
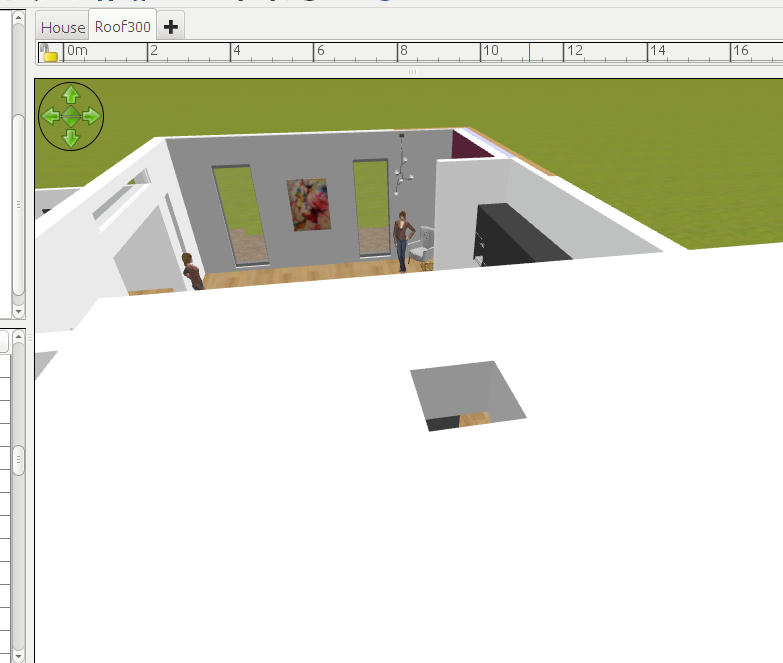
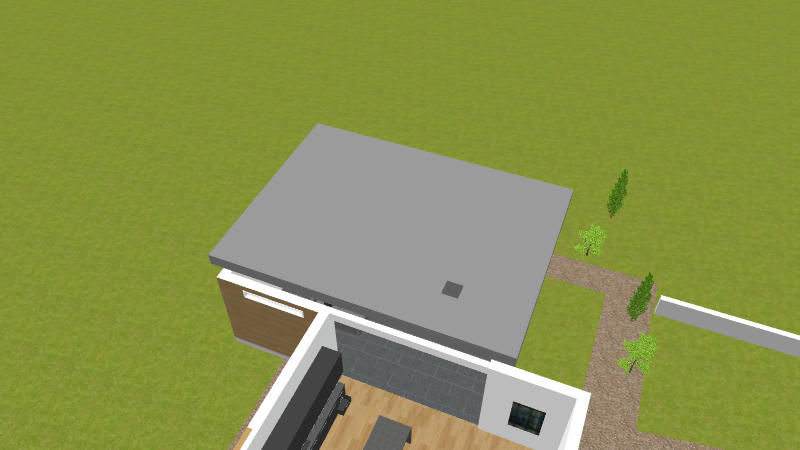
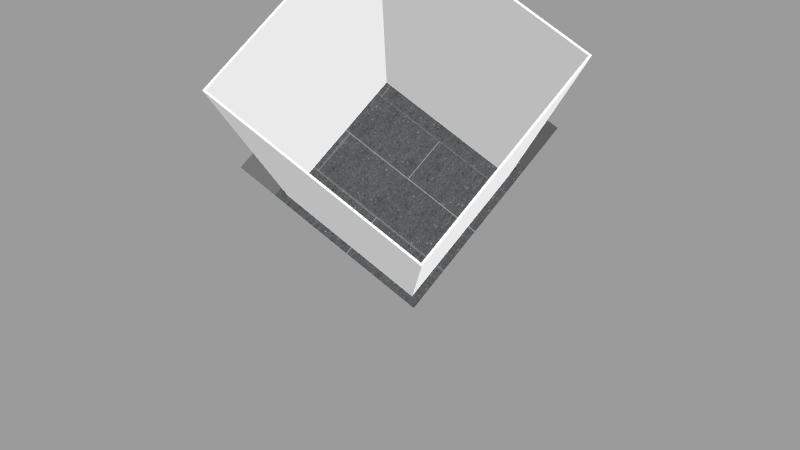
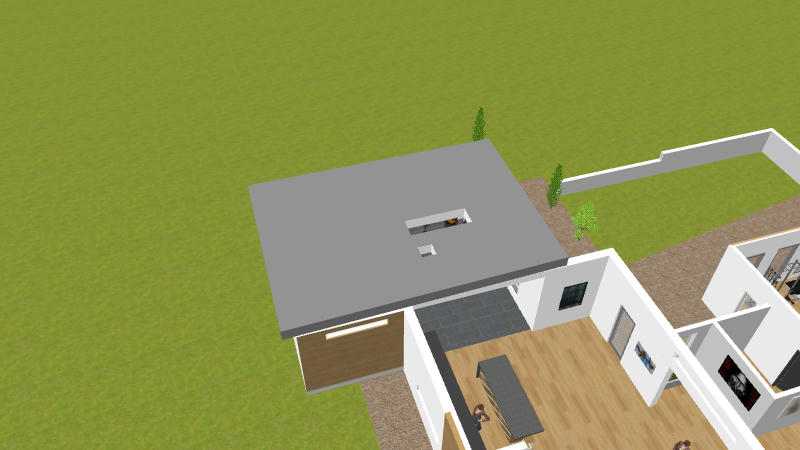
What I Wanted To Achieve For the sake of example I am only going to do one part of the roof that is why it is incomplete, the two cut outs shown are examples only.
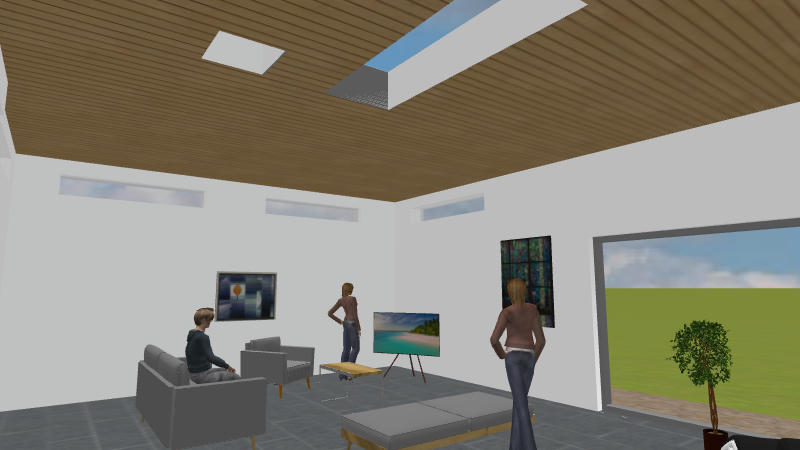
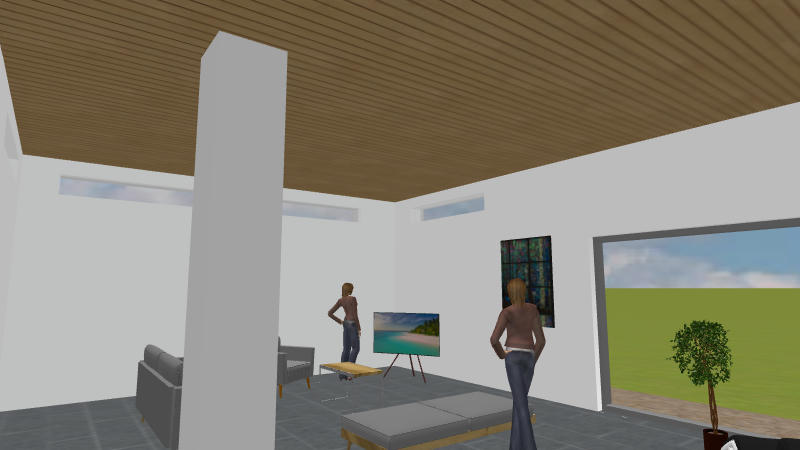
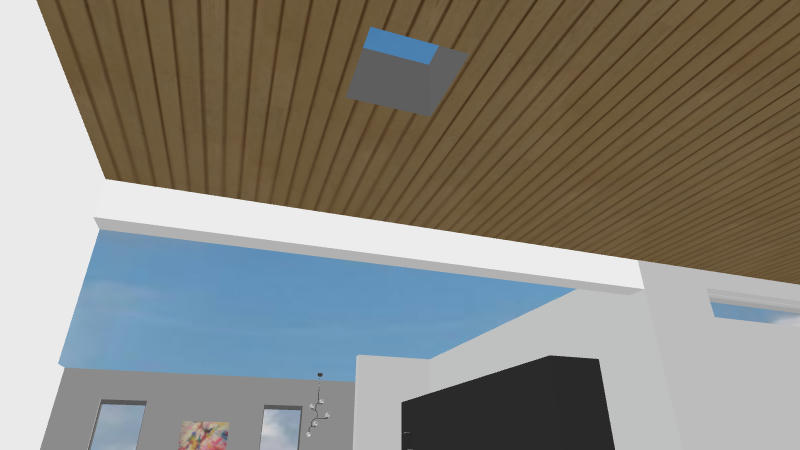
 And from below. Other Methods And Why Not Adopted 
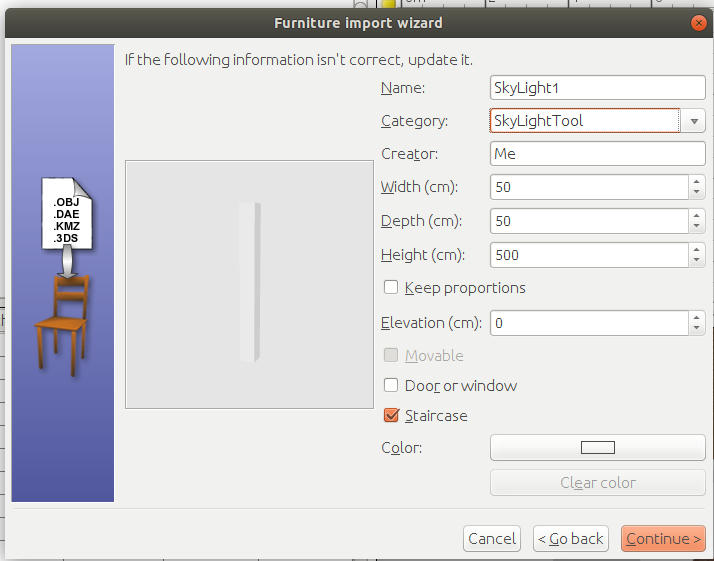
I tried the approach that uses a vertical wall, cuts a window, saves out to an OBJ file, (re)imports and during the import flips it to horizontal but this approach did not suit. 1. Not able to work in plan view, difficult to relate window to plan view objects. 2. Repeated export/import cycles in a dynamically changing model What I Wanted In A Method - to be able to.... 1. Edit, swap and change the roof, skylight size and position in a fluid manner without having to save out OBJ files. Yesterday's roof probably will not fit tomorrows tweaked design. 
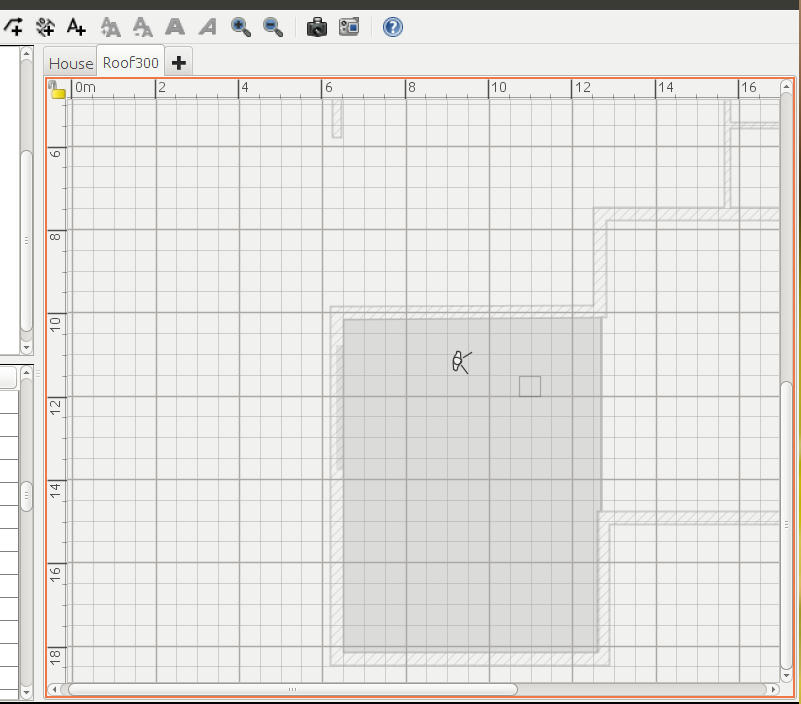
2. Work in plan view so I can see how it all fits together. 3. Control colour of plaster walls of skylight cut out. Roof is dark but when I look up from inside I want to see white plaster and hopefully a blue sky, this is an important aesthetic for me. 4. Have freedom over the shape of the roof to be able to follow the contour of walls, arbitrary shape in the sense of the perimeter of the roof. 5. Be able to texture the ceilings as seen from below and to be able to make changes on the fly. Overview Of Method The method involves use of levels with details of areas I had problems with and what the solutions were. continued in next post |
| Posted by Jonnie63 at Apr 15, 2019, 5:04:07 PM |
|
Re: Guide To Creating A Flat Roof With Cut Outs For Skylights Step One - Make The SkyLight 'Tool' Create a box or block - I will call this the "Skylight Tool" because it will be used to cut holes in the roof. To make the Skylight tool simply add a BOX which is in the Miscellaneous category of furniture. I made mine 50cm wide and deep and 500cm high, it can be resized later. In the second 'photo' it can be seen that I have a wood panel texture on the ceiling and the Skylight tool passes through, the ceiling does not show when viewed from above as you would expect. Select the SkyLight tool and save it out in an OBJ file. [ Menu ] 3D View -> Export to OBJ format. Make sure you export only the Skylight tool by selecting "Export Selection" when asked, check the export file was saved and then delete the original. The Skylight can now be imported back in from the OBJ file. The important step is to make sure that Skylight tool is imported with the same property as a Staircase - namely that it will cut a hole through any ceilings or floors it may pass through - see the ticked orange box in the next image. ![]() Position the Skylight tool back into the room, it will not yet cut a hole in the ceiling. continued in next post... |
| Posted by Jonnie63 at Apr 15, 2019, 5:43:45 PM |
|
Re: Guide To Creating A Flat Roof With Cut Outs For Skylights The next step is to add a level [menu option] Plan -> Add level This will do two things... 1. It will signal to Sweethome that we want the Skylight tool to cut a hole in the ceiling - Sweethome will not cut the hole if there is no upper level. 2. It will give us a place to construct the roof, actually as far as Sweethome is concerned the roof is really an upper level floor but for us its a roof. A note about levels ! When you create one you are asked for an elevation and a thickness but the elevation is measured to the top surface of the floor ( which for us is actually going to serve as a roof ) This means if your walls are 200 cm high and you want a roof that is 40 cm thick then you need to set the elevation to 240 cm, this will mean that the roof will sit on top of your 200cm walls. It may help to think of the roof not sitting on top of the level but actually hanging underneath it. I gave my level a sensible name Roof300 which indicates the height of the wall it will sit on - this is because I have different blocks in the building with different wall heights and so I need to have all roof sections at a particular height in the same level. To review, if the walls in question are 300cm high and the roof is set to 40cm thick, I need to create a level with elevation 340cm. Once the Roof (level) has been added the Skylight tool can actually cut a hole in the ceiling, however we will not see a hole ( viewing from underneath ) until the Skylight tool has been made invisible since it obscures the hole it makes. Here are the steps Select the Skylight tool. [ menu ] Furniture -> Modify ( or right click ) to modify the Skylight tool. Choose materials -> modify and set all 6 faces of the skylight tool to be invisible. This will not work using the visible 'box' in the home furniture list as that only indicates whether the Skylight tool should be present or absent in the model. Once this has been done then when viewed from underneath the ceiling should have a hole. If this does not happen check the following. 1. Is the Skylight tool invisible? 2. Was the level added? 3. Is the Skylight tool high enough to cut the ceiling. continued in next post |
| Posted by Jonnie63 at Apr 15, 2019, 6:46:37 PM |
|
Re: Guide To Creating A Flat Roof With Cut Outs For Skylights At this stage the plan should look something like this... We can see the virtual visitor and also the square outline of the Skylight. There are two levels one called house which contains pretty much everything in this single storey build, the other level called Roof300 is there for our roof which actually DreamHome thinks is a floor. To make the floor appear we need to define a room, Dreamhome already knows the elevation and thickness because those were set in the creation of the level. In my design I want a certain amount of overhang, in otherwords the roof is larger than the walls it sits on so I create a room by adding points which sits outside the perimeter of the walls. The steps are.... 1. Make sure that the tab for the second level in my case roof300 is selected. 2. Create a room on it by adding points, the great thing here is that we pick up all the usual alignment cues when moving the pointer around and can define pretty much any shape of perimeter for the roof. The plan view should now look something like this.... ![]() And in the aerial view the roof should be visible with the skylight in place. Its now possible to select the newly created roof and give it a colour. Remember - Sweethome thinks of the solid block that we call a roof as a room floor so actually we have to edit the room and change the colour for the floor. It may at this stage help to think of the room on the second level as a concrete second level floor before the walls are added. Setting the floor colour does not just set the top surface - the one you would walk on, it also sets colour on the sides and even the underneath. So after adding colour from above.... ![]() And from below. ![]() Note that the wood strip texture is still there, this is because it was defined as a texture on the ceiling of the ground floor room, the ceiling is the zero thickness sheet of colour or texture that Sweethome automatically adds (subject to options) when we are viewing from a point lower than the tops of the surounding walls. At this stage you may encounter problems with your ceiling texture not showing. If this is the case go check and edit the settings on level0 - I called mine 'Home' the one that most of your building is defined in. You may find it is necessary to lower the ceiling by say 0.1 cm so that it appears definitively beneath the solid roof that 'hangs' from level 1. The first time I tried this I did have to lower my ceiling by a tiny amount - it appears that the setting "Height" in the level determines at what height the ceiling should appear, just reduce it by a negligible amount and the ceiling should show, equally the ceiling disappears if you raise the ceiling by a small amount. Its a good idea to check the setting of height in level0 as Sweethome applies a default which may not match the wall heights. At this stage we are nearly complete, there is one remaining issue, when the skylight is viewed from below the side walls of the 'roof cut' are the same colour as the roof which may not be our preference. I will cover that last stage in the next post. continued in the next post |
| Posted by Jonnie63 at Apr 15, 2019, 7:26:37 PM |
|
Re: Guide To Creating A Flat Roof With Cut Outs For Skylights In this final stage we want to have control over the colour of the inner walls of the Skylight at the moment they are the same colour as the roof. This is achieved by creating a new level which is at the same height as the one we added for the roof. I called the level created for the roof Roof300 which indicated the height of the walls on which the roof rests so I will call this new level "WhiteLiner300" - white liner refers to the fact that we will be creating four very thin white walls that line inside the Skylight hole. My apologies to non native English speakers - a liner can be a kind of inner sleeve. The idea is simple. We are going to create very thin walls on this level that will sit inside the Skylight almost like wall paper, the walls will be used to give the correct colour. The useful thing about walls created on a level is that they start not at the top surface where you would walk but on the bottom surface of the level. This means the walls we create inside the skylight will start at the same height as the ground floor ceiling. This process is not difficult but users unfamilar with having more than one level will need to get used to a few things. 1. The view you see both in aerial and visit virtual mode depends on which level you have selected. 2. It may be difficult to create the white liner walls on level "WhiteLiner300" when other levels are visible. There are two options of interest [Menu] Plan -> Make Level The Only Viewable One [Menu] Plan -> Make All Levels Viewable. The first of the above makes the currently selected level visible. Most people will find it necessary to use both of the above options quite a lot during this process. Its actually quite simple but does take a little co-ordination. So here are the steps..... 1. Create a new level called "WhiteLiner300" which is just a copy of "Roof300". [menu] -> Plan -> Add level at same elevation ( as selected level ). 2. In plan view you should still see the outline of Skyline tool. 3. Create four walls which match the profile of Skyline tool. 4. Adjust the walls to be the same height as the roof thickness 5. Adjust the walls to be fairly thin - say 2 cm to begin with. 6. Zoom in and adjust the walls so that they sit inside the hole in the roof. 7. Zoom is as much as is required to fit the White liner walls so that they fit snuggly in the roof hole, reduce wall thickness to taste. I have missed out some basic skills, for instance you need to be able to create a closed loop of four walls by being able to "join" walls, to be able to colour the walls, move them around to adjust and so on. I hope the following image will help a little, I have deliberately left a big gap between liner and hole and made the White liner walls too high, I think it helps a little to see it this way. To finish off this example I would need to adjust the liner walls 'by eye judgement' and also set their correct height. ![]() If this seems like a complicated and long winded procedure it really is not that bad when do for real a few times. I will list some advantages in the next post.... continued in next post.. |
| Posted by Jonnie63 at Apr 15, 2019, 7:39:11 PM |
|
Re: Guide To Creating A Flat Roof With Cut Outs For Skylights Advantages To This Method. 1. The perimeter of the roof can be edited without needing to adjust the Skylight unless the roof edits actually affect the skylight area. 2. If the roof is slid around it can be seen that the skylight stays where it is. Alternatively if the roof, Skylight and Skylight liner are all selected then they can be moved as a group. 3. To change the cut dimensions of the Skylight it is only necessary to edit the Skylight tool - however the Skylight liner will not automatically resize because it has no real connection with either the Skylight hole or the Skylight tool that made it - it was created and sized purely by eye judgement so it will need similar attention again. Seriously though its not as complex as it sounds and was exactly the solution I was looking for. I can now create and tweak roofs and skylights but I will not have to "start all over again" each time I make a change to my house that affects the walls or roof. ===================== END ================================ |
| Posted by Jonnie63 at Apr 15, 2019, 7:56:41 PM |
|
Re: Guide To Creating A Flat Roof With Cut Outs For Skylights Additions: 1. Sorry I sometimes lapse into calling SweetHome DreamHome. 2. I forgot to add that the position of the Skylight can be changed by moving the skylight tool - if the Skyline liner is selected at the same time then it can be moved with the skylight. The skylight tool can be copied, resized and used elsewhere. It should be possible to add the Skylight tool with the Staircase flag activated to the furniture library so that a ready to use resizeable Skylight tool is there to use for any skylight. I am sure I will have to make some corrections to all of the above, it took a long time to write I am sure there are some mistakes. |
| Posted by Jonnie63 at Apr 15, 2019, 8:32:11 PM |
|
Re: Guide To Creating A Flat Roof With Cut Outs For Skylights Additions: I did not explain the following bit very well....its about making the White liner for the hole in the roof. I wrote... "The useful thing about walls created on a level is that they start not at the top surface where you would walk but on the bottom surface of the level." Yes that is true but what I did not mention is that even before you add any height to the wall it is already as high as the floor is thick - the wall is measured in terms of its height above the top surface of the floor. If you could have a zero height wall it would in reality be as high as the thickness of the floor. If I recall you cannot have a zero height wall so the wall can be set to a height of say 0.1 cm, this means it will start at the same level as the ceiling - pass through the entire thickness of the floor ( actually our roof ) and stick above the top surface of the floor (actually our roof ) by 0.1 cm. Just remember when setting the height of the White liner that you already get the thickness of the floor ( our roof ) for free !!! |
| Posted by Jonnie63 at Apr 15, 2019, 9:04:50 PM |
|
Re: Guide To Creating A Flat Roof With Cut Outs For Skylights Correction: The following is completely wrong - please text search for it. "4. Adjust the walls to be the same height as the roof thickness" No ! As mentioned above walls already get the floor thickness ( which for us means roof thickness ) for free. The walls need to be made only a nominal small height of say 0.1 cm. |
| Posted by Mike53 at Apr 15, 2019, 10:43:08 PM |
|
Re: Guide To Creating A Flat Roof With Cut Outs For Skylights HI jonnie looks like you may have done a lot of work to achieve the already achievable. If i understand correctly..... Cut a hole in the flat roof/ceiling that you can move and resize link Ability to change the color/texture of the hole sides..... Add a hatch from standard library to project....export it... import.. flip to horizontal and check the box for stairs... elevate into your ceiling, That may have done for you. Also, approx 2 yrs ago one of our Russian friends shared a file in which there were about a dozen different invisible shapes, not sure how or where you would search for it, but its in the ether somewhere. Mike |
| Posted by Mike53 at Apr 15, 2019, 10:45:21 PM |
|
Re: Guide To Creating A Flat Roof With Cut Outs For Skylights Thank you Veronique for the tutorial ![]() |
| Posted by Jonnie63 at Apr 16, 2019, 9:50:38 AM |
|
Re: Guide To Creating A Flat Roof With Cut Outs For Skylights Hi Mike, Thanks, yes it looks like its pretty much the same thing, the article is even in the Tips and Tricks section where I looked! I guess I did not pick up on it because it only mentioned walls in the title, I did pick up on the later "How To Design A Sloping Ceiling With A Window" I have been aware of that one but it wasn't really what I needed. I will look at your suggestion for the "liner" not quite sure what the "check the box for the stairs" bit means - if that will somehow autosize the hatch then it would probably be less work. Somehow I don't feel it was a waste of time, good learning experience and now I have entered the world of levels which I think will give benefits. I instinctively like the idea of being able to group and organise all the roof stuff in different levels representing different heights, it might be worth checking to see if there are any issues having an additional ground zero level just for the invisible cut out boxes just to keep it tidy. Yes thanks to Veronique, good article probably more coherent than my attempt as well. I do wonder however if it is possible to edit the Blog whether it might prove useful to add something to the title to include roof as well as walls. |
| Posted by Jonnie63 at Apr 16, 2019, 3:36:43 PM |
|
Re: Guide To Creating A Flat Roof With Cut Outs For Skylights Just an update if anyone tries a similar design in future - ie one that is essentially a house with a single floor level but multiple ceiling and roof heights. What I was trying to do here was to deploy Sweethome 'levels' having a single ground level for the whole building and then have raised levels at different heights to be used as the basis for flat roofs at different heights ( although the roofs were actually floors as far as Sweethome was concerned ). This all worked fine to a degree. However each roof "slab" will get the same colour on the underside as on the top face so a dark grey roof will deliver a dark grey ceiling unless the Sweethome "show ceiling" option is used since that will "cover-up" the underside of the roof with a different texture or colour. I have since discovered that for a given construction on one level it is only possible to have one unique ceiling height whereas I would need three different ceiling heights to cover up my grey roof when seen from below* I can still achieve everything I currently want simply by prioritising the Sweethome ceiling for the one room where I use a texture (wood slat ceiling) currently - the limitation being that any other ceilings in other areas that also require this texture must be at the same height as the first, other rooms will have the "show ceiling" option false so that the roof slab shows as ceiling. I will then default the three roofs to white ( the preferred ceiling colour ) and simply change the roof colours back to dark grey for any aerial video or photos - its not a big deal and will take only a few seconds. I will still require the skylight White liners if I want the skylights to look realistic from above if I have reverted the roofs to dark grey. Footnote: *I could possibly split my ground level building into several levels all at zero height but I think the pragmatic approach suggested above is easier. |
| Posted by Mike53 at Apr 16, 2019, 6:39:57 PM |
|
Re: Guide To Creating A Flat Roof With Cut Outs For Skylights With levels you could, for instance...... Have 3 all at the same elevation but different heights, effectively giving three ceiling heights A further 3, each with an elevation to match the ceiling below, your roof's. Taking into consideration one of your other posts, make this 6 or 9 levels with the same floor/ roof set up as the first. You could now position walls doors windows etc in the 1st, copy them to 2nd and 3rd thereby enabling you to change colours/textures and compare/change them in 3 different homes all in 1 file, no more opening and closing. File could get very big very quickly so I would advise avoiding things like plants and trees. May help Mike |
| Posted by Mike53 at Apr 16, 2019, 6:42:54 PM |
|
Re: Guide To Creating A Flat Roof With Cut Outs For Skylights Roof's could also have different depth's too |
| Posted by Jonnie63 at Apr 17, 2019, 1:30:11 PM |
|
Re: Guide To Creating A Flat Roof With Cut Outs For Skylights Hi Mike Thanks, yes as I mentioned in the footnote I could split the ground floor into levels just for the benefit of the ceilings but I am reluctant at this stage to add that level of complication - it might bite me later on There are some consequences to levels, for instance you can only see through one level to the next one below - even if you turn off visibility for '2' - '1' will still not show through in plan view when you are working on level 3. Folks working on mult-storey buildings may not want the visual clutter of x-ray eyes that can see through more than one level below but of course levels do not imply vertical stacking as in my case. At the moment if I want to make an edit to a roof I have to temporarily lower the containing level to be the lowest of the roof levels so I can see the ground plan below and reference it when for instance I make a roof that needs to overhang the walls by a certain distance etc. I then move the level back up to is correct height. At the moment I have 4 levels - ground and roofs 1, 2 and 3 so I am tempted to stay with the current complexity at least for a while. At the moment I am not restricted in what I can do the consequences are simply an extra little task between renderings, photo or video shoots - I am happy to live with a white roof block when merely editing. None of the "I have to" statements above are moans, once it becomes part of the workflow its just a few key strokes - I think there is a massive difference between a limitation that just means you have to do a little more admin style work and a limitation that stops you achieving a result. I have to say SweetHome is an amazing tool, today I was doing fine editing removing tiny slivers of wall, simplifying and re-aligning walls - all imperfections my own doing after countless fast edits, pushing a wall here, extending there and generally working fast to get the over-view before focusing on getting everything shipshape. The fact that my model held together, that floors could still be computed automatically is a testament to just how well written this software is. When I first started this design trip I was proposing to use Solidworks because that was the only tool I had to hand - how naive was I !!! I would have only been able to design a roof wall and ceiling outline the rest would have been possible but just to much work and complication - I really do take my hat off to the Puybarets. Now having a bit of fun playing with the Advanced video plugin - have you tried it? For fun I am seeing just how far I can get with a GrandDesigns style fly around using only open source tools - I need a break from the real work ![]() |
| Posted by Jonnie63 at Apr 17, 2019, 1:33:47 PM |
|
Re: Guide To Creating A Flat Roof With Cut Outs For Skylights Sorry I shouldn't make assumptions. Solidworks is a CADCAM package, great for designing high accuracy engineered parts, cars and consumer goods but not really optimised for architectural work. |
| Posted by Mike53 at Apr 17, 2019, 4:00:43 PM |
|
Re: Guide To Creating A Flat Roof With Cut Outs For Skylights Never tried a video mate, my pc can barely handle renders ![]() Not sure why you feel you have to lower a roof to make fine tweaks to position it, would "display all levels" instead of "selected level" be a help? |
| Posted by Jonnie63 at Apr 17, 2019, 6:00:38 PM |
|
Re: Guide To Creating A Flat Roof With Cut Outs For Skylights Hi Mike. It is necessary to lower the roof or rather the level in which it is defined because.... 3 2 1 0 Means I can see level 0 'through the floor' when working on level 1 but if I move up to level 2 to make a change I cannot see level 0 so there I am blind. So I need to change the relative heights 3 1 2 0 Now I can see level 0 'through the floor' whilst working on level 2 - I can edit the roof and check it fits relative to whats going on on the ground floor. It's not a "do once" thing for me - constantly tweaking things and ripple adjustments move out through the building. The behaviour is documented in the tips section "How To Design A Split Level House" Quote: "Unfortunately, Sweet Home 3D draws only walls of the previous level in light grey. Therefore, the shop walls drawn at Level 0 won't appear at Level 2, because its previous level is Level 1 and not Level 0" The suggested workaround there is to copy 3d objects as markers between floors but I just move my levels up and down - my levels are actually named according to their elevation so I do not forget and tap in the wrong number when I restore the level to its normal height after the edit. Its not a hassle for me - just tap in a number before the edit and restore it after. Its all really just about being able to see the ground floor items when editing the profile of the roof, editing a skylight or similar. What I am really pleased about is that now I am working this way using dummy floors as ceilings then a tweak only involves an edit to a boundary whereas before it meant messing around with creating OBJ files and exporting them, repositioning them and so on. |
| Posted by Jonnie63 at Apr 17, 2019, 6:03:28 PM |
|
Re: Guide To Creating A Flat Roof With Cut Outs For Skylights Yes Mike the "see through the floor" aspect of the plan view when working on levels does not adjust when levels are made invisible, I thought it might work that way, that invisible levels would not block the "see through the floor" aspect of the plan but it does not work that way. |
|
|
Current timezone is GMT Dec 20, 2025, 6:43:49 AM |