
An trick I use for this kind of task (multiply furniture at different positions only on X or only on Y; e.g. steps of stairs).
1. Select the object and Ctrl+C
2. Ctrl+V and then Delete (first paste are placated on a different position than the original and I don't need it)
3. Ctrl+V again (the pasted object will be exactly superpose over the copy one and became selected)
4. Ctrl+Shift+E or right click and manually edit the position and/or elevation
Draw (offset) Wall from Existing Wall?
This topic has been viewed 7196 times and has 14 replies
Re: Draw (offset) Wall from Existing Wall?
A computer program does what you tell it to do, not what you want it to do. Murphy's Law
When all else fails, read the instructions. Murphy's Law
If you don't like "AS IS", DIY. Dorin's law
When all else fails, read the instructions. Murphy's Law
If you don't like "AS IS", DIY. Dorin's law
Re: Draw (offset) Wall from Existing Wall?
I would've loved to have responded sooner to your suggestions, but this forum doesn't seem to send out notices on "watched" or subscribed posts.
Where can I post help requests regarding forum issues instead of crowding this post and having my primary concern lost within other help replies?
Okay, okh and dorin, I understand your suggestions. However, when I attempt to input an offset dimension by simply adding a value to the existing X or Y coordinate (as okh gives), the Modify Wall field will not keep or do anything with the new input.
ex. If I type +5' (plus five feet) into the two X-fields, the original dimension is shown with nothing changed. Sure wish this forum would accept screenshots.
So, what else am I not understanding about "adding" a distance to offset by typing in to these fields?
Thanks in advance,
Delain
Where can I post help requests regarding forum issues instead of crowding this post and having my primary concern lost within other help replies?
Okay, okh and dorin, I understand your suggestions. However, when I attempt to input an offset dimension by simply adding a value to the existing X or Y coordinate (as okh gives), the Modify Wall field will not keep or do anything with the new input.
ex. If I type +5' (plus five feet) into the two X-fields, the original dimension is shown with nothing changed. Sure wish this forum would accept screenshots.
So, what else am I not understanding about "adding" a distance to offset by typing in to these fields?
Thanks in advance,
Delain
Re: Draw (offset) Wall from Existing Wall?
You need SH3D 6.0 (latest version) for calculation to work in the X fields. How, or rather if, this would work with foot/inch/fraction, I do not know, but it seems to work with Inch/decimals. So if you have 6.0, try changing to Inch/decimals in Preferences. Or, of course, you could take a leap in to metric... [:)] okIf I type +5' (plus five feet) into the two X-fields, the original dimension is shown with nothing changed.
Re: Draw (offset) Wall from Existing Wall?
Now that has got to be an oversight on the developer's end! Guess I won't be using that method of offset'ing a duplicated line. Your assumption is correct; this will not work with Foot/Inch/Fraction setting but will work with Inch/Decimal. I work with Foot/Inch/Fraction, so this is not viable for me.
I actually came up with a workable method for drawing a wall at an offset from an existing wall. And I knew how to insert screenshots into a post using this forum, the explanation would be much simpler than trying to narrate it.
Thank you,
Delain
I actually came up with a workable method for drawing a wall at an offset from an existing wall. And I knew how to insert screenshots into a post using this forum, the explanation would be much simpler than trying to narrate it.
Thank you,
Delain
Re: Draw (offset) Wall from Existing Wall?
Here is my solution to my own help request. Hopefully, this won't result in "Uh, yeah, everyone knows this." I was surprised that I didn't receive more input on this inquiry since it seems like a very basic need. (If you review the previous responses in this help post, you will see that using the Modify Wall feature and keying-in XY offsets will not work for me since I work in Foot/Inch/Fraction preference.)
Let's see if my attempt at inserting images will work for this.
First image is a series of grabs from a quick video I made showing the solution. The idea is that you use a temporary wall placement as a "guide wall" to establish the offset from the existing wall or object.
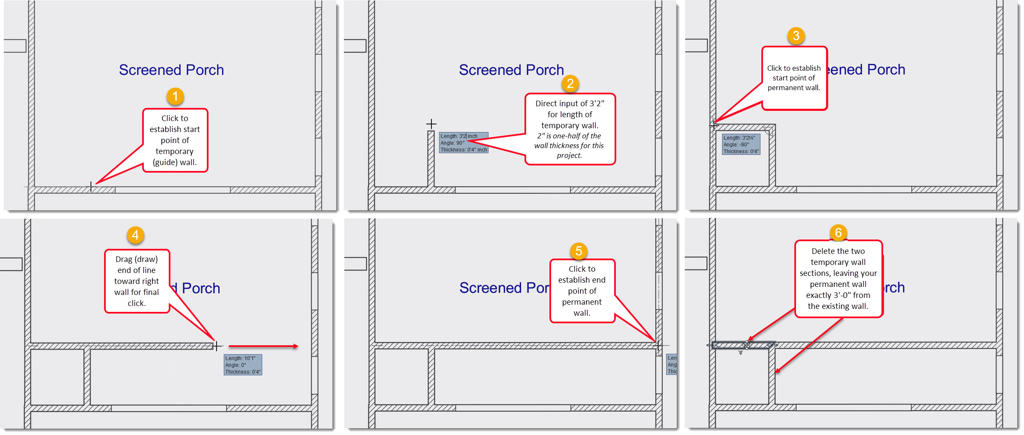
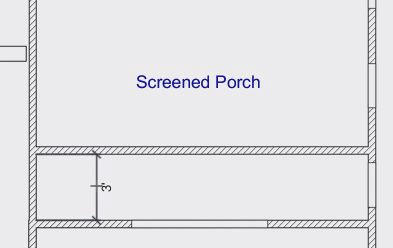
In this case, I am wanting to draw a wall that will end up being 3'-0" parallel to the existing wall of a room. Since this project uses 4" as the wall thickness preference, I include half of that, 2", in my temporary wall length.
Step 1&2 - draw a wall that is 3'-2" perpendicular from the existing wall side. I do this using direct input (of 3'-2" and Enter) for the second wall end. If you go from the existing wall's centerline, you will need to input as 3'-4".
Step 3 - continue without interrupting the Wall draw action and move mouse directly to the left wall to establish the start point of your permanent wall, and click.
Step 4&5 - move the mouse toward the right wall and click to set the end point of the permanent wall. Hit Escape or select the Select object command which completes the Wall draw action.
Step 6 - Select and Delete the two temporary guide walls leaving you with the single permanent wall.
Here is the quick video. Draw wall with guide walls
There ya go; hope it helps someone else.
Thanks to those who did throw in on this previously with their methods.
Thank you,
Delain
Let's see if my attempt at inserting images will work for this.
First image is a series of grabs from a quick video I made showing the solution. The idea is that you use a temporary wall placement as a "guide wall" to establish the offset from the existing wall or object.
In this case, I am wanting to draw a wall that will end up being 3'-0" parallel to the existing wall of a room. Since this project uses 4" as the wall thickness preference, I include half of that, 2", in my temporary wall length.
Step 1&2 - draw a wall that is 3'-2" perpendicular from the existing wall side. I do this using direct input (of 3'-2" and Enter) for the second wall end. If you go from the existing wall's centerline, you will need to input as 3'-4".
Step 3 - continue without interrupting the Wall draw action and move mouse directly to the left wall to establish the start point of your permanent wall, and click.
Step 4&5 - move the mouse toward the right wall and click to set the end point of the permanent wall. Hit Escape or select the Select object command which completes the Wall draw action.
Step 6 - Select and Delete the two temporary guide walls leaving you with the single permanent wall.
Here is the quick video. Draw wall with guide walls
There ya go; hope it helps someone else.
Thanks to those who did throw in on this previously with their methods.
Thank you,
Delain
Who is online
Users browsing this forum: No registered users and 1 guest