
@ enkonyito
I think this is a very good solution!
Cec
Photo rendering test
This topic has been viewed 1802815 times and has 68 replies
Re: Photo rendering test
@Ceciliabr
Unfortunately, the plug-in can not be at the same time compatible with the standard version of SH3D and take into account this feature (adjustable ceiling light power) in the derived version. [:(]
PS: The plug-in and the derived version of SH3D will be able to use a light panel as ceiling light.
Unfortunately, the plug-in can not be at the same time compatible with the standard version of SH3D and take into account this feature (adjustable ceiling light power) in the derived version. [:(]
PS: The plug-in and the derived version of SH3D will be able to use a light panel as ceiling light.
EnkoNyito
Re: Photo rendering test
Love these lights Enkonyito, like Hans, i have them pointing up at low power, and, as if by magic, white ceilings, thank for that. Still no idea about all the version numbers and abbreviations mean, but then, i have never even changed anything in the advanced settings for the rendering tools, so its not an issue. i look forward to your final versions, if there can be such a thing.
thank you again
Mike
thank you again
Mike
Re: Photo rendering test
Hi all !
I propose you to test a feature that automatically adds ambient lighting instead of a room's ceiling light.
With silk shader


With glossy shader


Don't hesitate to say what you think.
I propose you to test a feature that automatically adds ambient lighting instead of a room's ceiling light.
With silk shader
With glossy shader
Don't hesitate to say what you think.
- Attachments
-
- PVR-1.7betaTest2.sh3p
- (318.89 KiB) Downloaded 375668 times
-
- PVR-1.7betaTest2.sh3p
- (319.13 KiB) Downloaded 377019 times
EnkoNyito
-
ndorigatti
- Posts: 66
- Joined: Fri May 12, 2017 9:54 am
- Country: Italia
Re: Photo rendering test
May I vote about 10 times?
In any case, YES!!!
I've never used ceiling lights, but I will for sure use this option!
In any case, YES!!!
I've never used ceiling lights, but I will for sure use this option!
Re: Photo rendering test
Hello Enko,
After playing a bit with this beta version, I have a few questions:
1 - The amount of light is quite low. Is there a way to increase it?
2 - Where is the light source placed? Where do the shadows originate?
3 - What is the difference with a (large) light source placed in the (middle of) the room?
Thanks for your efforts!
H
After playing a bit with this beta version, I have a few questions:
1 - The amount of light is quite low. Is there a way to increase it?
2 - Where is the light source placed? Where do the shadows originate?
3 - What is the difference with a (large) light source placed in the (middle of) the room?
Thanks for your efforts!
H
-
UbuntuBirdy

- Posts: 421
- Joined: Thu Aug 31, 2017 10:31 pm
- Country: Switzerland
- Contact:
Re: Photo rendering test
I often use ceiling lights, but I'm never really happy with the result...
And now you give us ambient light - and I'm happy!
But as Hans mentioned, the amount of light is quite low. Would be great if we could adjust that value.
And now you give us ambient light - and I'm happy!
But as Hans mentioned, the amount of light is quite low. Would be great if we could adjust that value.
Pascal
SH3D 6.6 / Ubuntu 22.04 (Mainline-Kernel) / Radeon RX580 / Ryzen 7 5800x
SH3D 6.6 / Ubuntu 22.04 (Mainline-Kernel) / Radeon RX580 / Ryzen 7 5800x
Re: Photo rendering test
This sounds excellent, agree with Hans's points, the brightness is down to personal opinion, but, i do wonder if it's possible, at the level you have shown, could it be linked to the time of day, eg, your example = 8AM, probably means a lot of work, i have no idea, may work though.
Mike
Mike
Re: Photo rendering test
Glad to see the interest you all have for this option!
by this one using 2 light panels
In both cases, the power is based on the area of the room.
The main difference between a large light sphere and light panels is that they can be placed very close to an object and project much softer shadows.
That's why I chose the solution of a medium panel on the ceiling and a panel 4 times bigger on the floor with a power 4 times smaller. This gives the impression that light comes from all sides.
I updated the download link with a version using the "maximum" power.
It would be possible to manually change the power of the ambient lighting with radio buttons or a slider but it would be necessary to see the impact that it could have on the interface of photo rendering.
Enko
Like the light panel - daylight? Yes, but the interest of ambient lighting is that it works day and night....could it be linked to the time of day...
In the part of the source code managing the ceiling light of the rooms, I replaced this treatment using a light sphere1 - The amount of light is quite low. Is there a way to increase it?
2 - Where is the light source placed? Where do the shadows originate?
3 - What is the difference with a (large) light source placed in the (middle of) the room?
Code: Select all
float power = (float)Math.sqrt(room.getArea()) / 3;
this.sunflow.parameter("radiance", null,
    power * (ceillingLightColor >> 16) / 0xD0 * (this.homeLightColor >> 16) / 255,
    power * ((ceillingLightColor >> 8) & 0xFF) / 0xD0 * ((this.homeLightColor >> 8) & 0xFF) / 255,
    power * (ceillingLightColor & 0xFF) / 0xD0 * (this.homeLightColor & 0xFF) / 255);
this.sunflow.parameter("center", new Point3(xCenter, roomHeight - 25, yCenter));
this.sunflow.parameter("radius", 20f);
this.sunflow.parameter("samples", 4);
this.sunflow.light(UUID.randomUUID().toString(), "sphere");Code: Select all
float roomAreaInSquareMeter = room.getArea() / 10000;
float power = (float) Math.sqrt(roomAreaInSquareMeter) / 4; // TEST
float panelSize = (float) Math.sqrt(room.getArea()) / 4; // dimension in cm
// face-down panel
float illuminatingFaceElevation = roomHeight;
float[] verticesCoordinates1 = {xCenter - (panelSize / 2), illuminatingFaceElevation, yCenter - (panelSize / 2),
    xCenter + (panelSize / 2), illuminatingFaceElevation, yCenter - (panelSize / 2),
    xCenter + (panelSize / 2), illuminatingFaceElevation, yCenter + (panelSize / 2),
    xCenter - (panelSize / 2), illuminatingFaceElevation, yCenter + (panelSize / 2)};
addLightPanelsToSunflow(power, ceillingLightColor, verticesCoordinates1);
// face-up panel
power = power / 4;
panelSize = (float) Math.sqrt(room.getArea()) / 2; // dimension in cm
illuminatingFaceElevation = roomElevation;
float[] verticesCoordinates2 = {xCenter - (panelSize / 2), illuminatingFaceElevation, yCenter + (panelSize / 2),
    xCenter + (panelSize / 2), illuminatingFaceElevation, yCenter + (panelSize / 2),
    xCenter + (panelSize / 2), illuminatingFaceElevation, yCenter - (panelSize / 2),
    xCenter - (panelSize / 2), illuminatingFaceElevation, yCenter - (panelSize / 2)};
addLightPanelsToSunflow(power, ceillingLightColor, verticesCoordinates2);The main difference between a large light sphere and light panels is that they can be placed very close to an object and project much softer shadows.
That's why I chose the solution of a medium panel on the ceiling and a panel 4 times bigger on the floor with a power 4 times smaller. This gives the impression that light comes from all sides.
I updated the download link with a version using the "maximum" power.
It would be possible to manually change the power of the ambient lighting with radio buttons or a slider but it would be necessary to see the impact that it could have on the interface of photo rendering.
Enko
EnkoNyito
Re: Photo rendering test
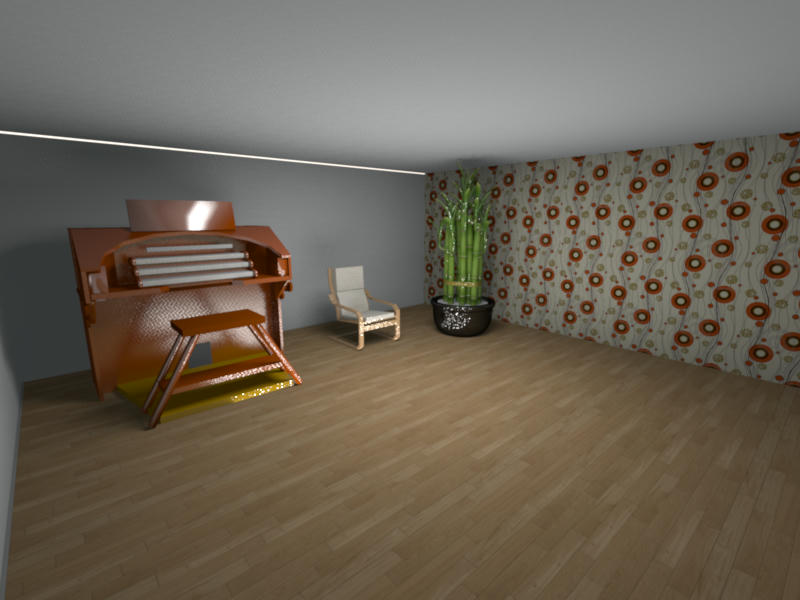
This is the result of a quick test of version 2. The level of illumination is now very usable as a kind of basic lighting.
Unfortunately there is a white line along the ceiling.
I think a way to set the lighting level is needed, preferably numerical (1-100?).
H
Who is online
Users browsing this forum: No registered users and 1 guest