Russia
Joined: Aug 13, 2022
Post Count: 481
Status:
Offline
A way to make any model in the correct sizes
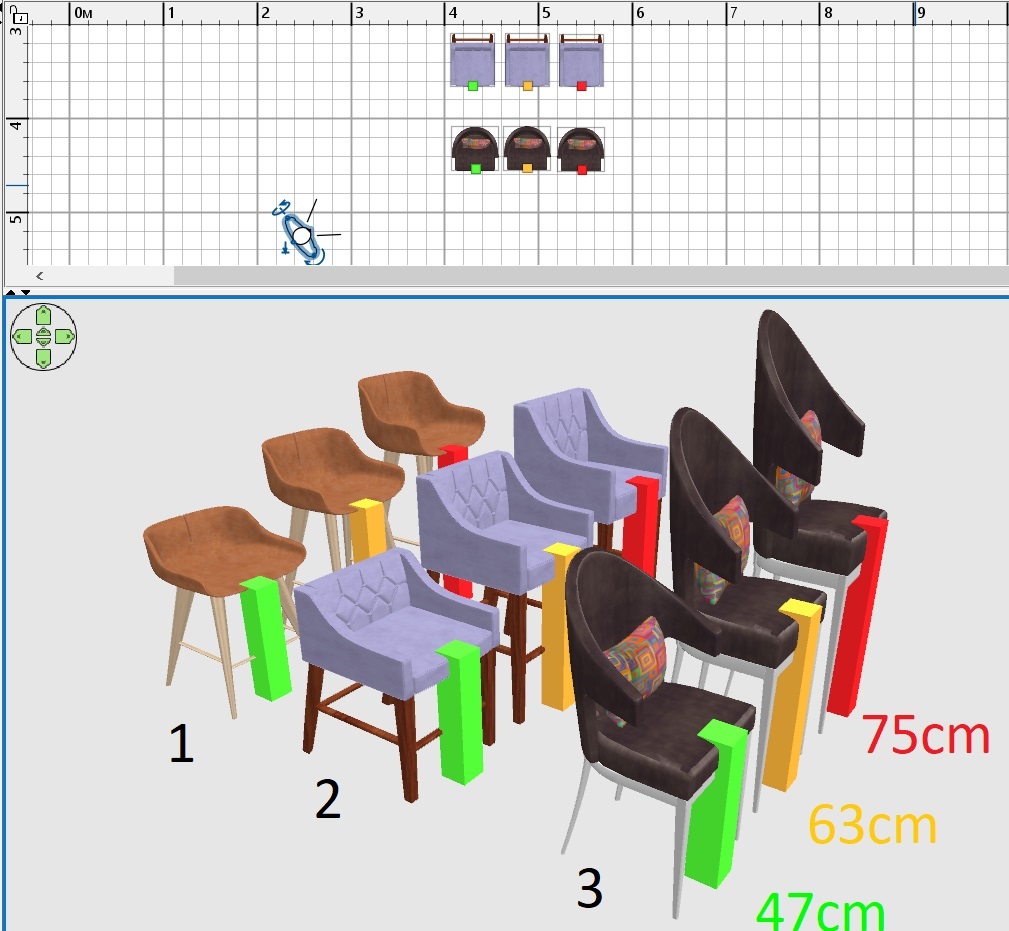
There is a basic size for each item in the interior, which must be carried out very carefully. For example, a chair. They come in three types. A simple low chair at the dining table, a medium bar stool at the kitchen counter, and a high bar stool at the bar counter. In chairs, the most important size is the height of the seat. The low chair is 47 cm for a 75 cm table. The average chair is 63 cm for a table of 90-91 cm. 75 cm high chair for 103 cm table. Usually, the model comes in curved sizes and it is unclear how to make it in the interior correctly. First, determine the width and length of the chair. To do this, find a similar model in the drawing on the Internet. Now make a template from a bright-colored box with a width of 10 cm and a height of 47 cm, place this template on the edge of the chair. And now, using this change tool, pull out the entire chair according to the template. In this way, you can make three different types of chairs from one model for different occasions.
But pay attention. Chairs 1 and 2 were high bar stools at first, they make all the other lower versions work well because the backrest is getting smaller, but this is normal, there are such designs of chairs with a low backrest. But if the chair is low at first, then the backrest increases disproportionately in other types, the chair becomes disproportionate because of the backrest (number 3). Therefore, it is better to make changes from high bar stools rather than the other way around.
Russia
Joined: Aug 13, 2022
Post Count: 481
Status:
Offline
Re: A way to make any model in the correct sizes
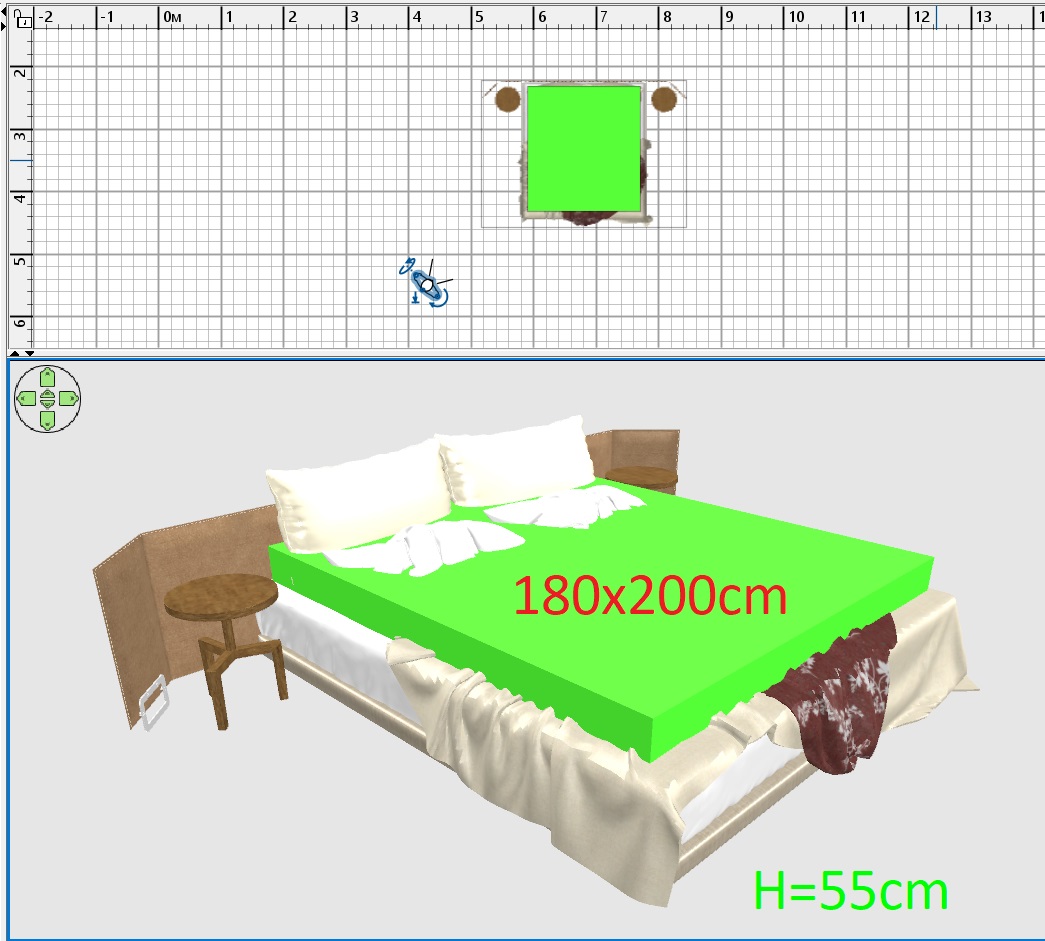
Now for the more complicated case. Bed. Often the bed model is complemented by a headboard, bedside tables, it has pillows, a blanket hangs on the floor. All this makes the model incomprehensible in size. But there is an important element to the bed. It's a mattress. All mattresses are standardized. the width of the mattress for a single bed is 90 or 100 cm, the length is 200 cm. For a double bed, these are sizes 140-160-180-200 cm. The length is also 200cm. Download the model, keep the proportions and set the height of the backrest to 70cm, which is usually much lower than the bed in reality. Now make a bright-colored mattress template. I made 180x200 cm, height 55cm. This is the usual standard height of the mattress in the bed, but I advise you to measure your bed with a tape measure at home, this will convince you of the truthfulness of the height. She may be a little different, trust her. Now stretch the model by the corner so that the bright template fits into place, but sticks up out of the bed, align the bed and the template, to do this, turn off the magnet.
Now select the bed model and stretch it up so that the mattress template starts to be covered with the model's blanket. This will be the correct proportion of the bed inside a complex model. Remove the template and you're done.
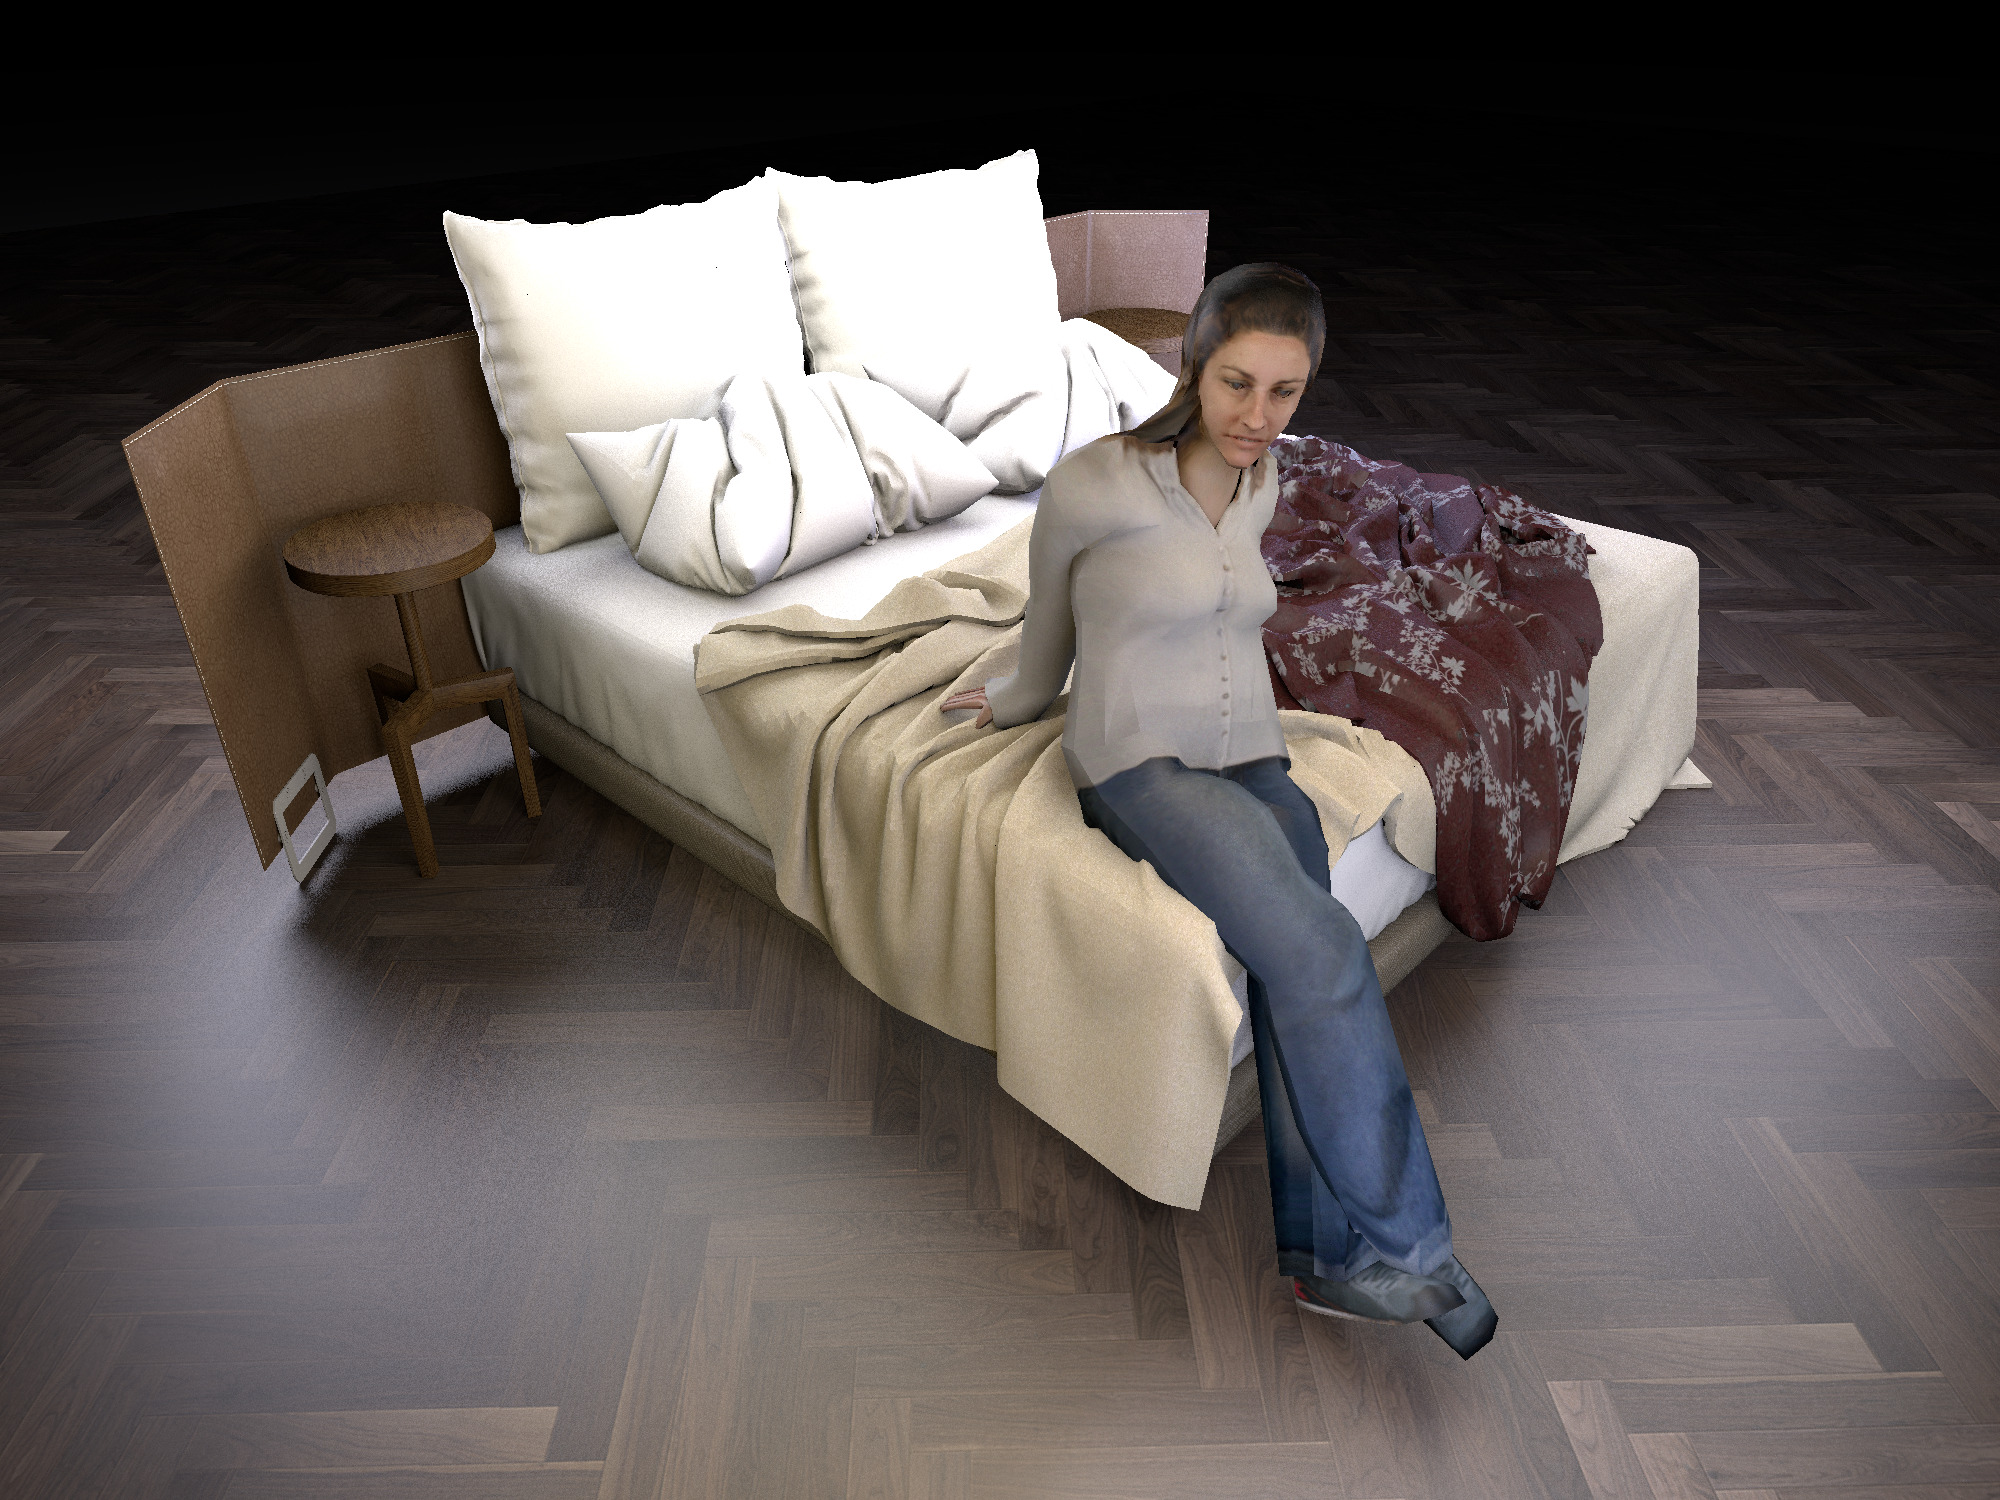
You can put a model of a girl on such a bed, make a height of 130 cm for her, keeping the proportions. She will push through the bed a little, this is how it will be in reality, she will sit a little deeper. The girl's model can be rotated slightly on the X-axis if it turns out completely without hands. I turned 10 degrees so that my fingers appeared on the bedspread.
Russia
Joined: Aug 13, 2022
Post Count: 481
Status:
Offline
Re: A way to make any model in the correct sizes
For armchairs, the seat height is 42-45 cm, for sofas, too, 45 cm. The dining table is 75 cm, the writing table may be slightly higher, 77 cm. The height of the kitchen countertop is usually 90-91cm, this size may be slightly smaller due to ergonomics, for example, for people of small stature (the height of the countertop is 87cm). The bottom of the upper hanging cabinets of the kitchen is +60cm from the countertop level. The height of an ordinary kitchen faucet is 26-30cm. The height of a conventional sink faucet is 15-18 cm. The height of the tub is 58cm. The height of the sink is 87cm. Toilet bowl top (faience) 40cm. All these sizes can be easily found on the Internet by searching. Query for example "kitchen faucet drawing", "toilet bowl drawing". If everything is done truthfully, then the look of the interior will also become as truthful as possible, there will be no awkward feeling of some kind of toy appearance. For complex models, template checks are needed. For example, a person is checked by eye level. The required height of a person is minus 15 cm. Because the model can be wearing a hat or with a raised hand. For a seated person, the eye level is 110-115cm. And then the visualizations will become more photorealistic))))) Because the models will stop being ugly.
Russia
Joined: Aug 13, 2022
Post Count: 481
Status:
Offline
Re: A way to make any model in the correct sizes
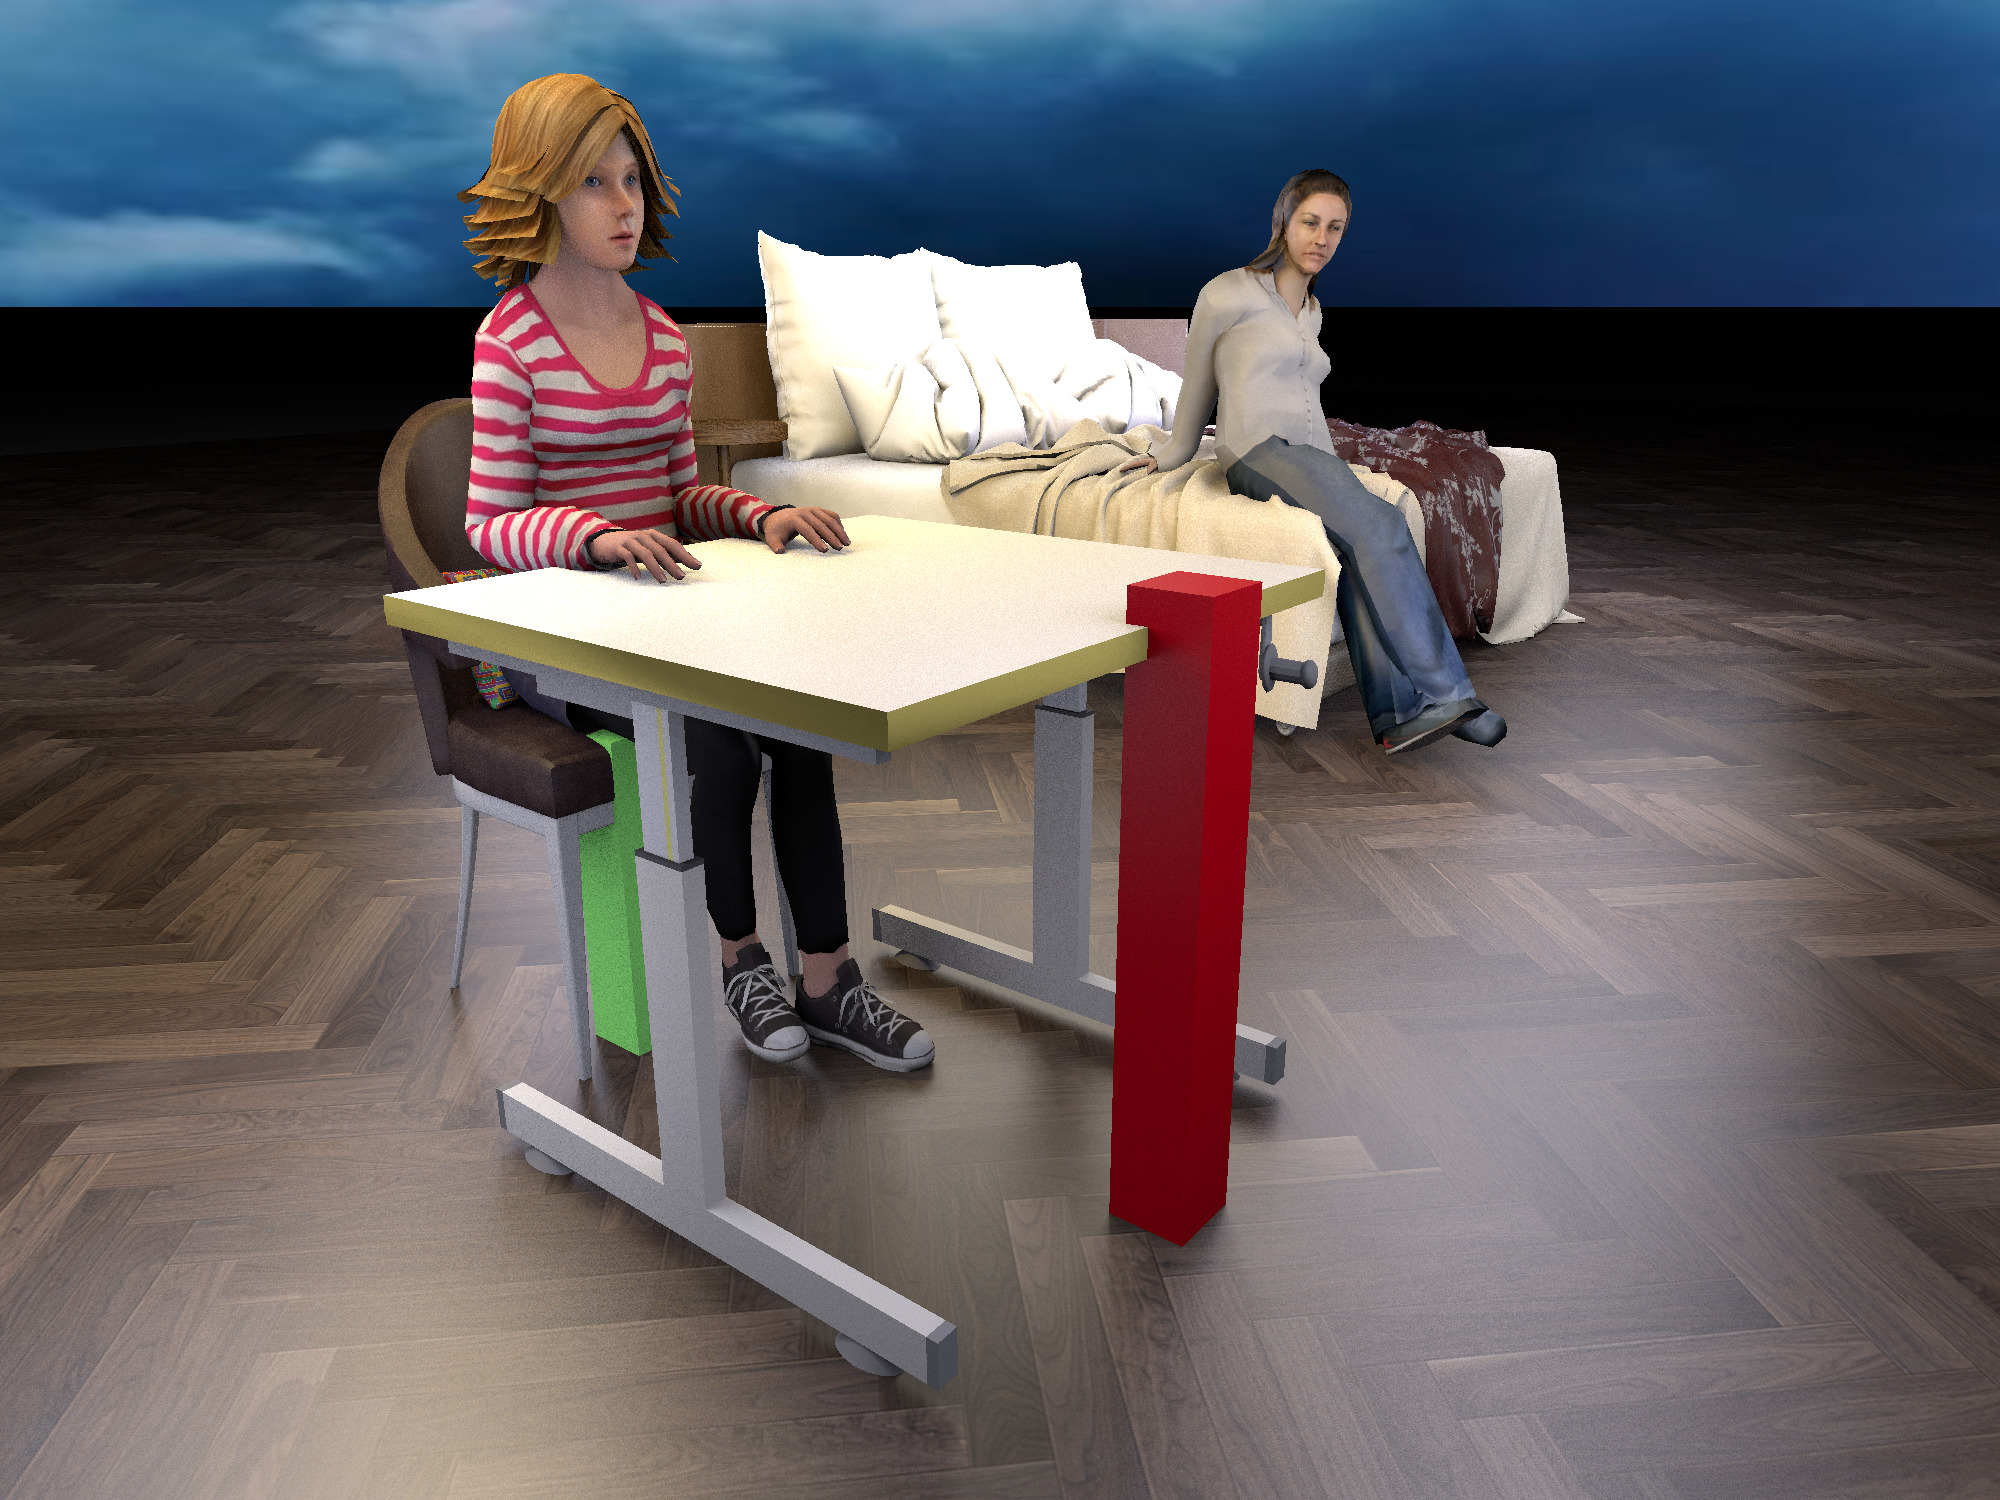
The biggest problem is if you need to combine several furniture models and a human figure. In reality, a person is a flexible system, he takes different poses, his arms move, his elbows can adjust to the level of the table, his back can bend, his legs can take a comfortable position. The 3D model is stationary and it is often difficult to connect a 3D person, chair and table, for example. Something is necessarily a different size, it does not connect without overlapping or gaps. I took the model from the SH3D library. The girl sat well on a standard 47cm chair, everything matched. But the model's hands turned out to be at 71 cm, which is the level of the piano keyboard, which is 75 cm by 4 cm below the table level. Therefore, there are several possible solutions in such cases. 1. Change the size of one of these objects or even a person. It is undesirable to change the size of a person, there is a risk of getting a giant or a midget. So I decided to lower the table level to fit the model's arms. The correct 75 cm table height template is shown in red. It can be seen that the table level in the render is 4 cm lower. The second option is to increase the height of the chair seat by 4 cm. In this case, the girl's feet will not rest on the floor, it is unrealistic. The third option is the most difficult - to make a girl's figure from two halves, Legs and upper body with arms, from two parts of two models. The model allows you to make some parts of the body invisible. You can slightly increase the bottom and slightly decrease the top. Slightly increase the chair, slightly decrease the table. But then you can get a disproportionate figure from a girl. Therefore, it is better to lower the soulless table and leave the person alone. For realism, you should always think about the true proportions and decide where to change these proportions with minimal loss to the picture. If you don't think about anything at all and put everything together, it turns out to be funny, ridiculous and ugly nonsense. This is important in order to get closer to a professional result.
Netherlands
Joined: Apr 8, 2022
Post Count: 1248
Status:
Offline
Re: A way to make any model in the correct sizes
I use that box trick very often! Works great, just like you described.
A little addition that might be helpful in some cases: You can modify the measuring box and check "Part of base plan". Then lock the 2D view with the little lock in the top-left corner. Now the box is fixed in the plan and you can draw over it without accidentally selecting the box itself. When done unlock the plan and you can remove the box.
---------------------------------------- Dodecagon.nl 950+ 3D models, manuals, and projects
Russia
Joined: Aug 13, 2022
Post Count: 481
Status:
Offline
Re: A way to make any model in the correct sizes
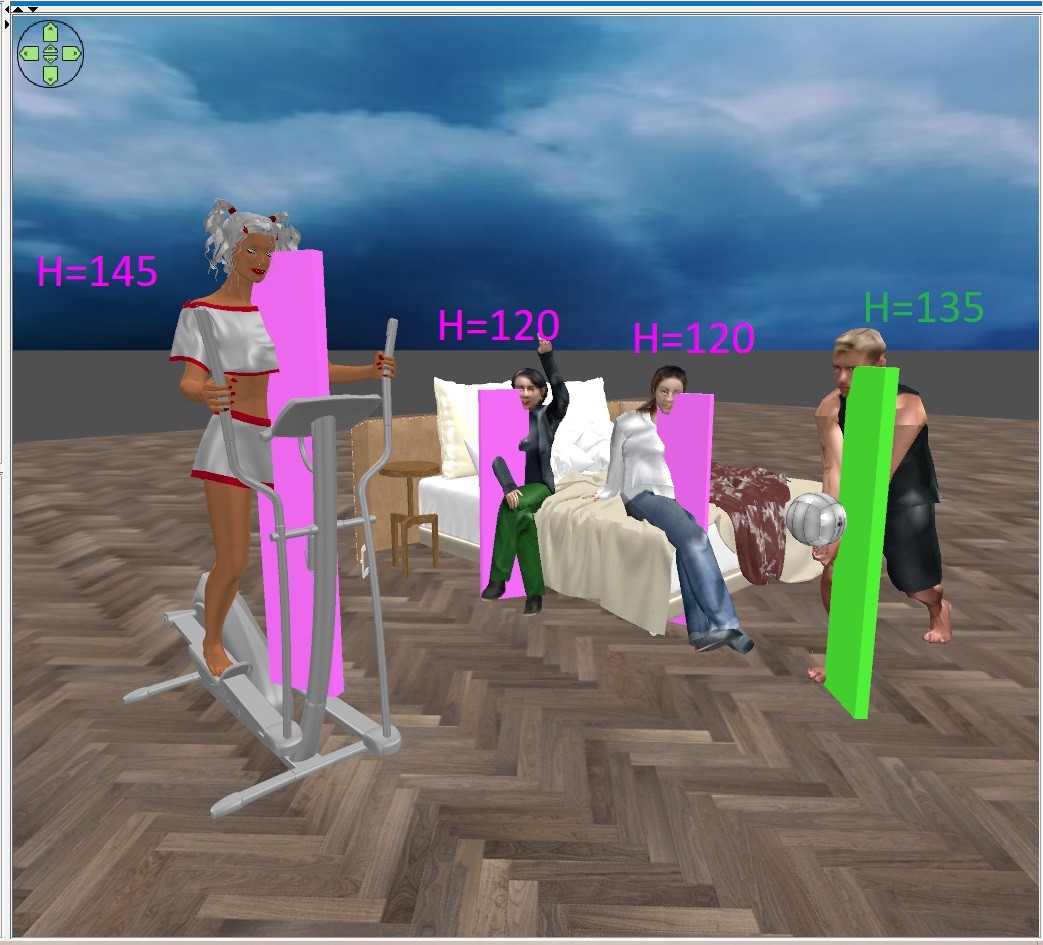
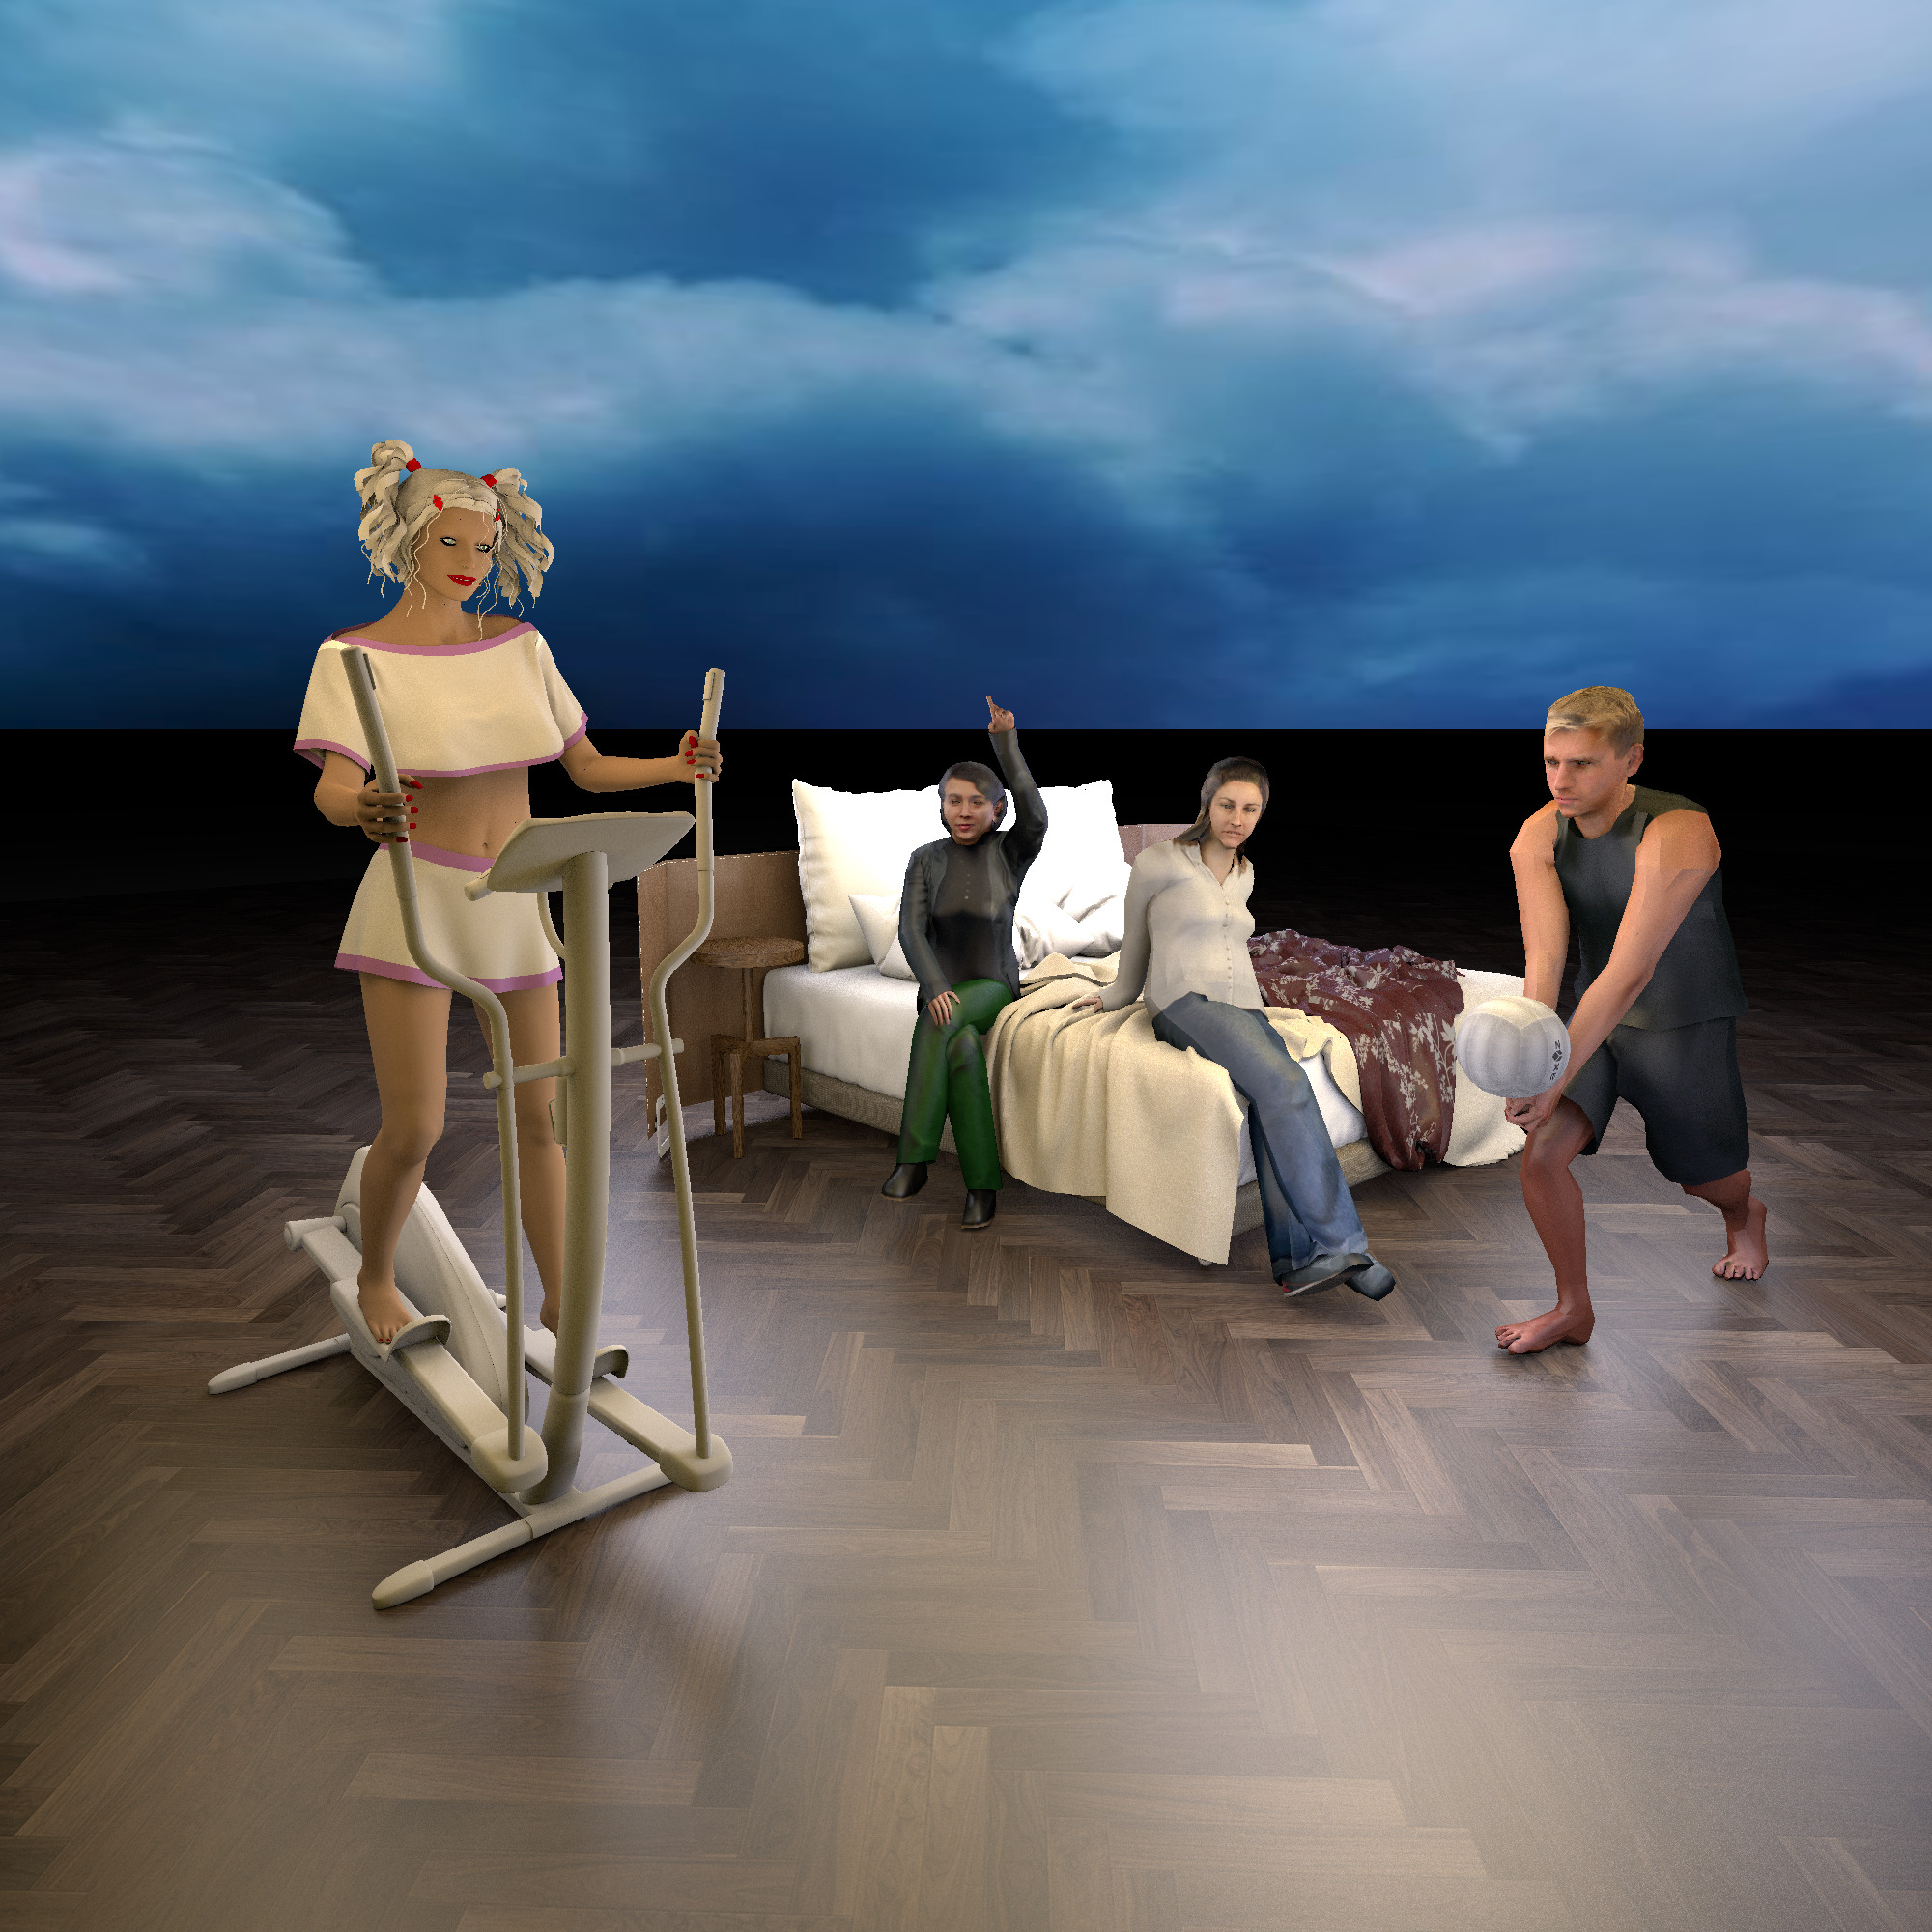
Thank you Keet, your advice is very helpful every time, thank you! I will continue my research on humans)). I have found several complex models of people. You need to insert templates of different sizes everywhere. And most importantly, you can't stretch the model like chairs or a bed. It is important for people to keep the proportions, check the box "keep proportions" and change all the sizes simultaneously in the table. The girl on the gym has her feet on the pedals, not on the floor. I made the template 145 cm, for the girl's height 160 cm. Due to the fact that the legs are slightly bent. Place the bottom of the template on a step with a supporting foot, and smoothly resize the entire model without distorting the proportions. A girl on a bed with her hand raised along with a template 120cm from the floor. You also need to gradually change the size of the entire model, not just the height. The man with the volleyball sat down, so you need to measure his pose by yourself. I got 135cm in the eyes. As a result, all the shapes look almost right))). The eyes are a great reference point for humans.
Russia
Joined: Aug 13, 2022
Post Count: 481
Status:
Offline
Re: A way to make any model in the correct sizes
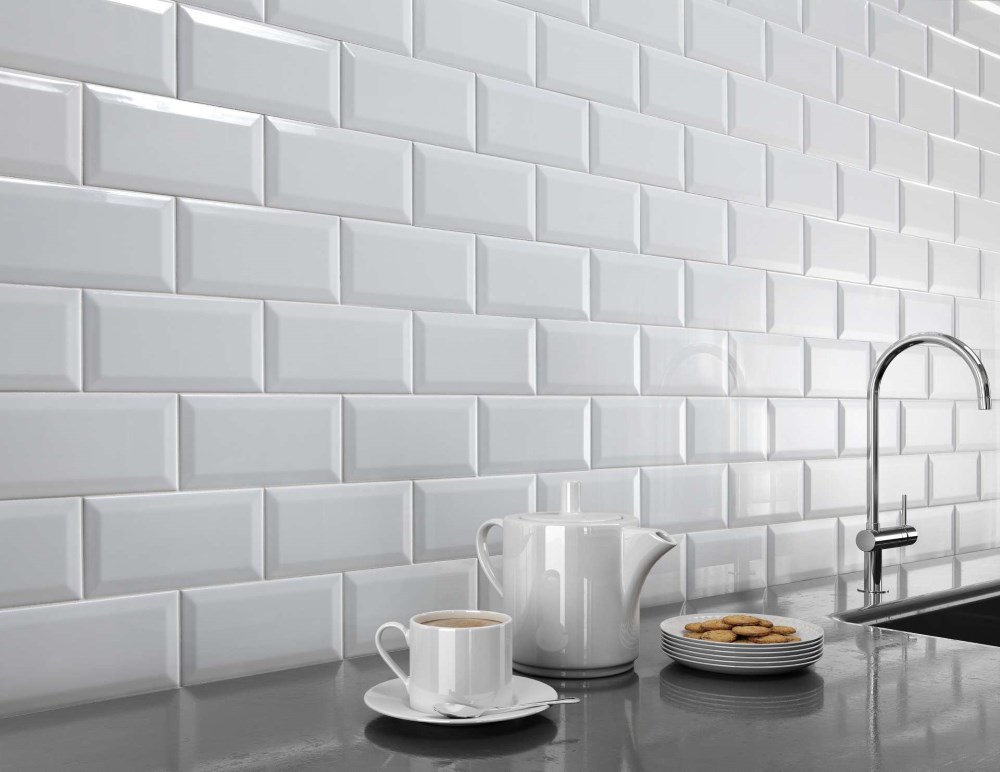
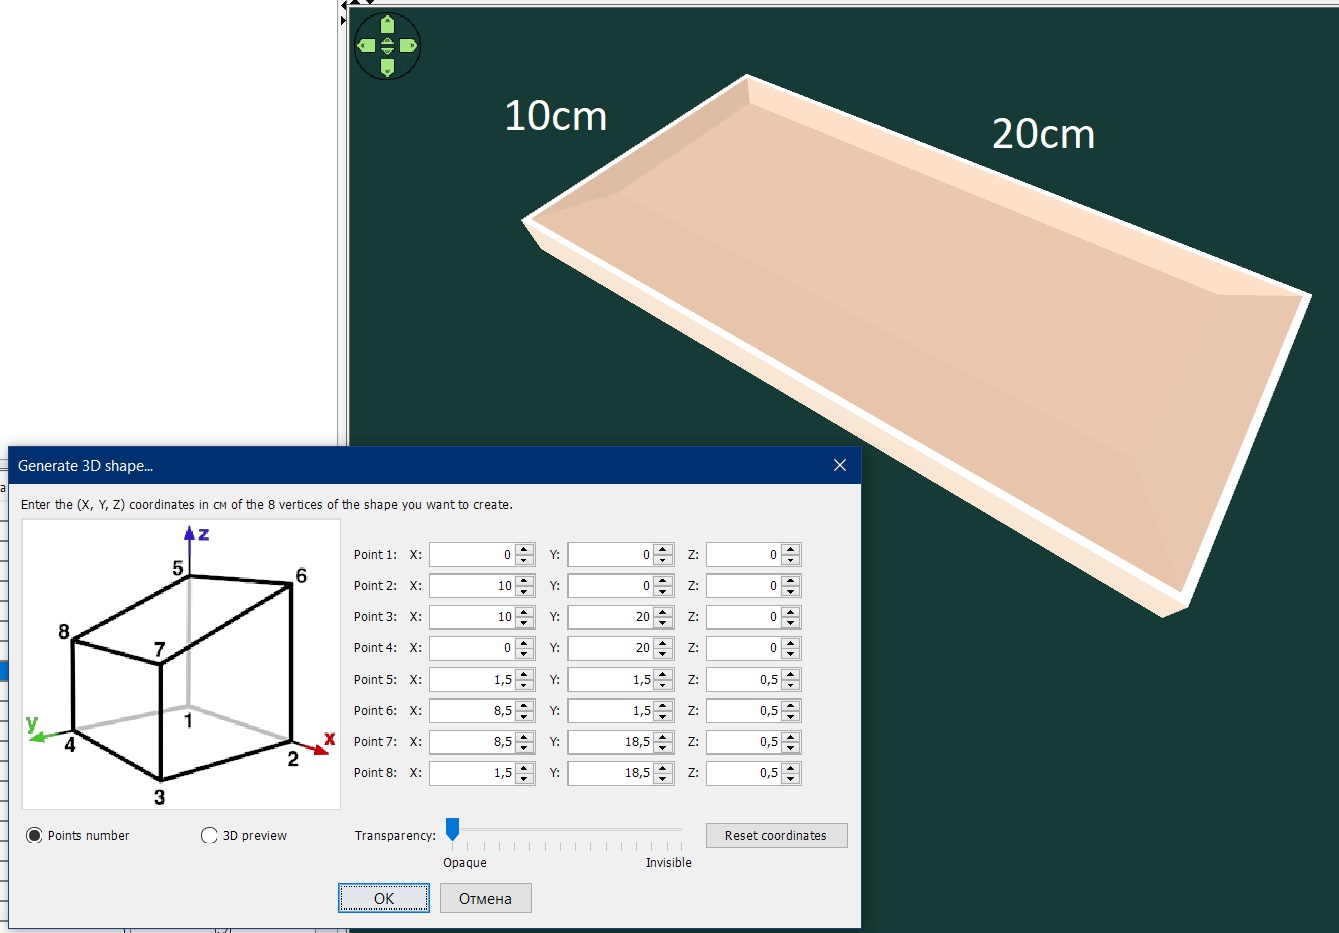
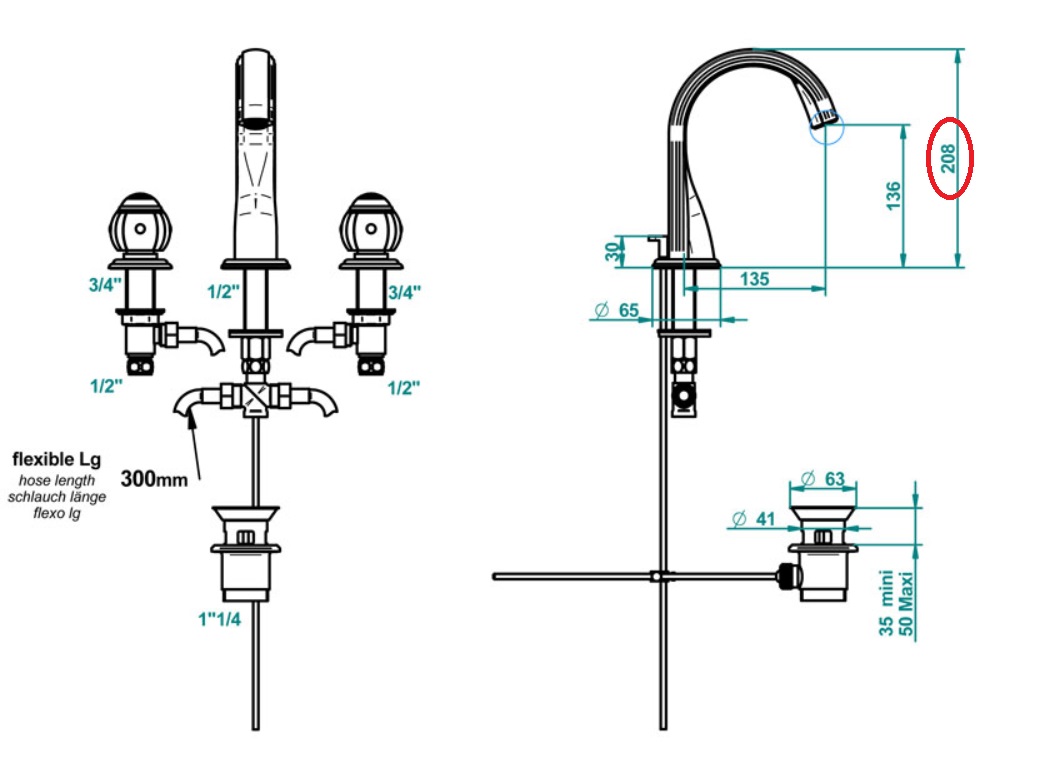
I will tell you how you can make a very realistic tile on the wall. With relief and an interplate seam. I took a small tile with 10x20 cm faces and modeled it using "Generate 3D shape from coordinates".
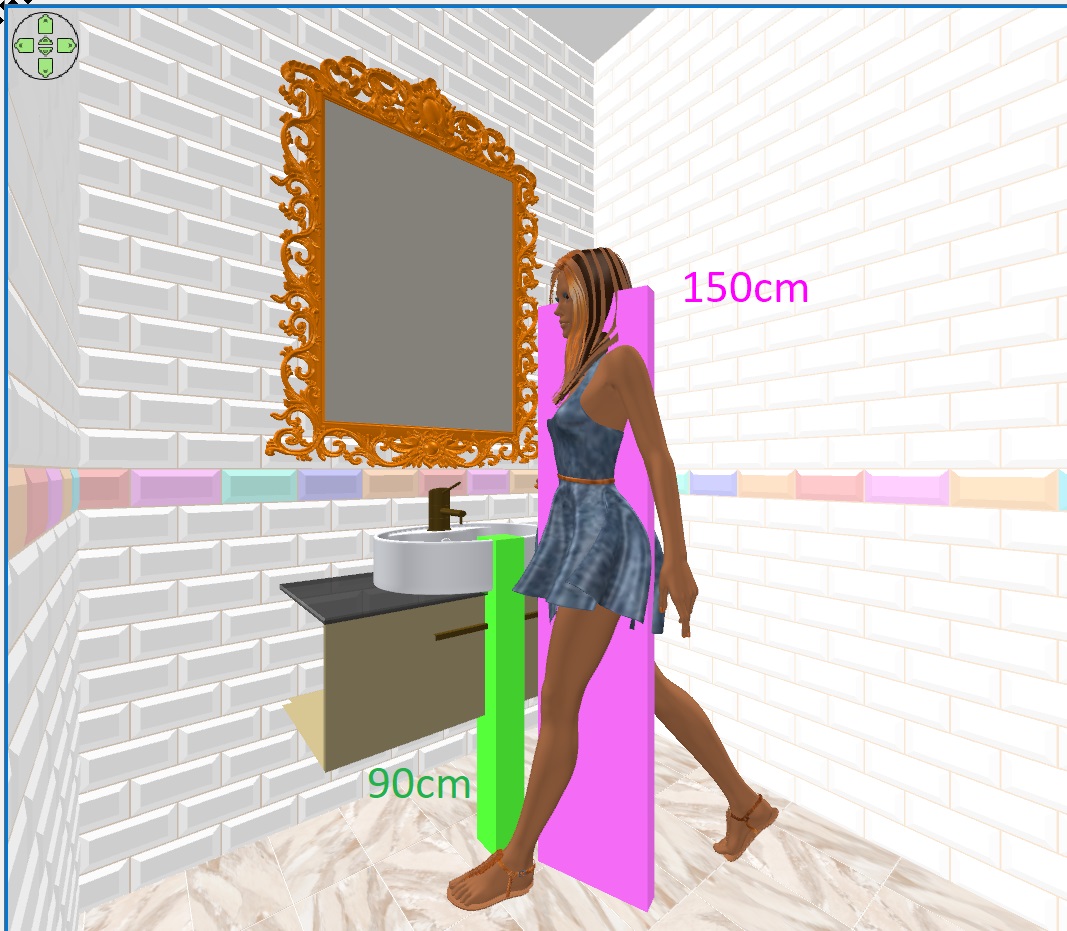
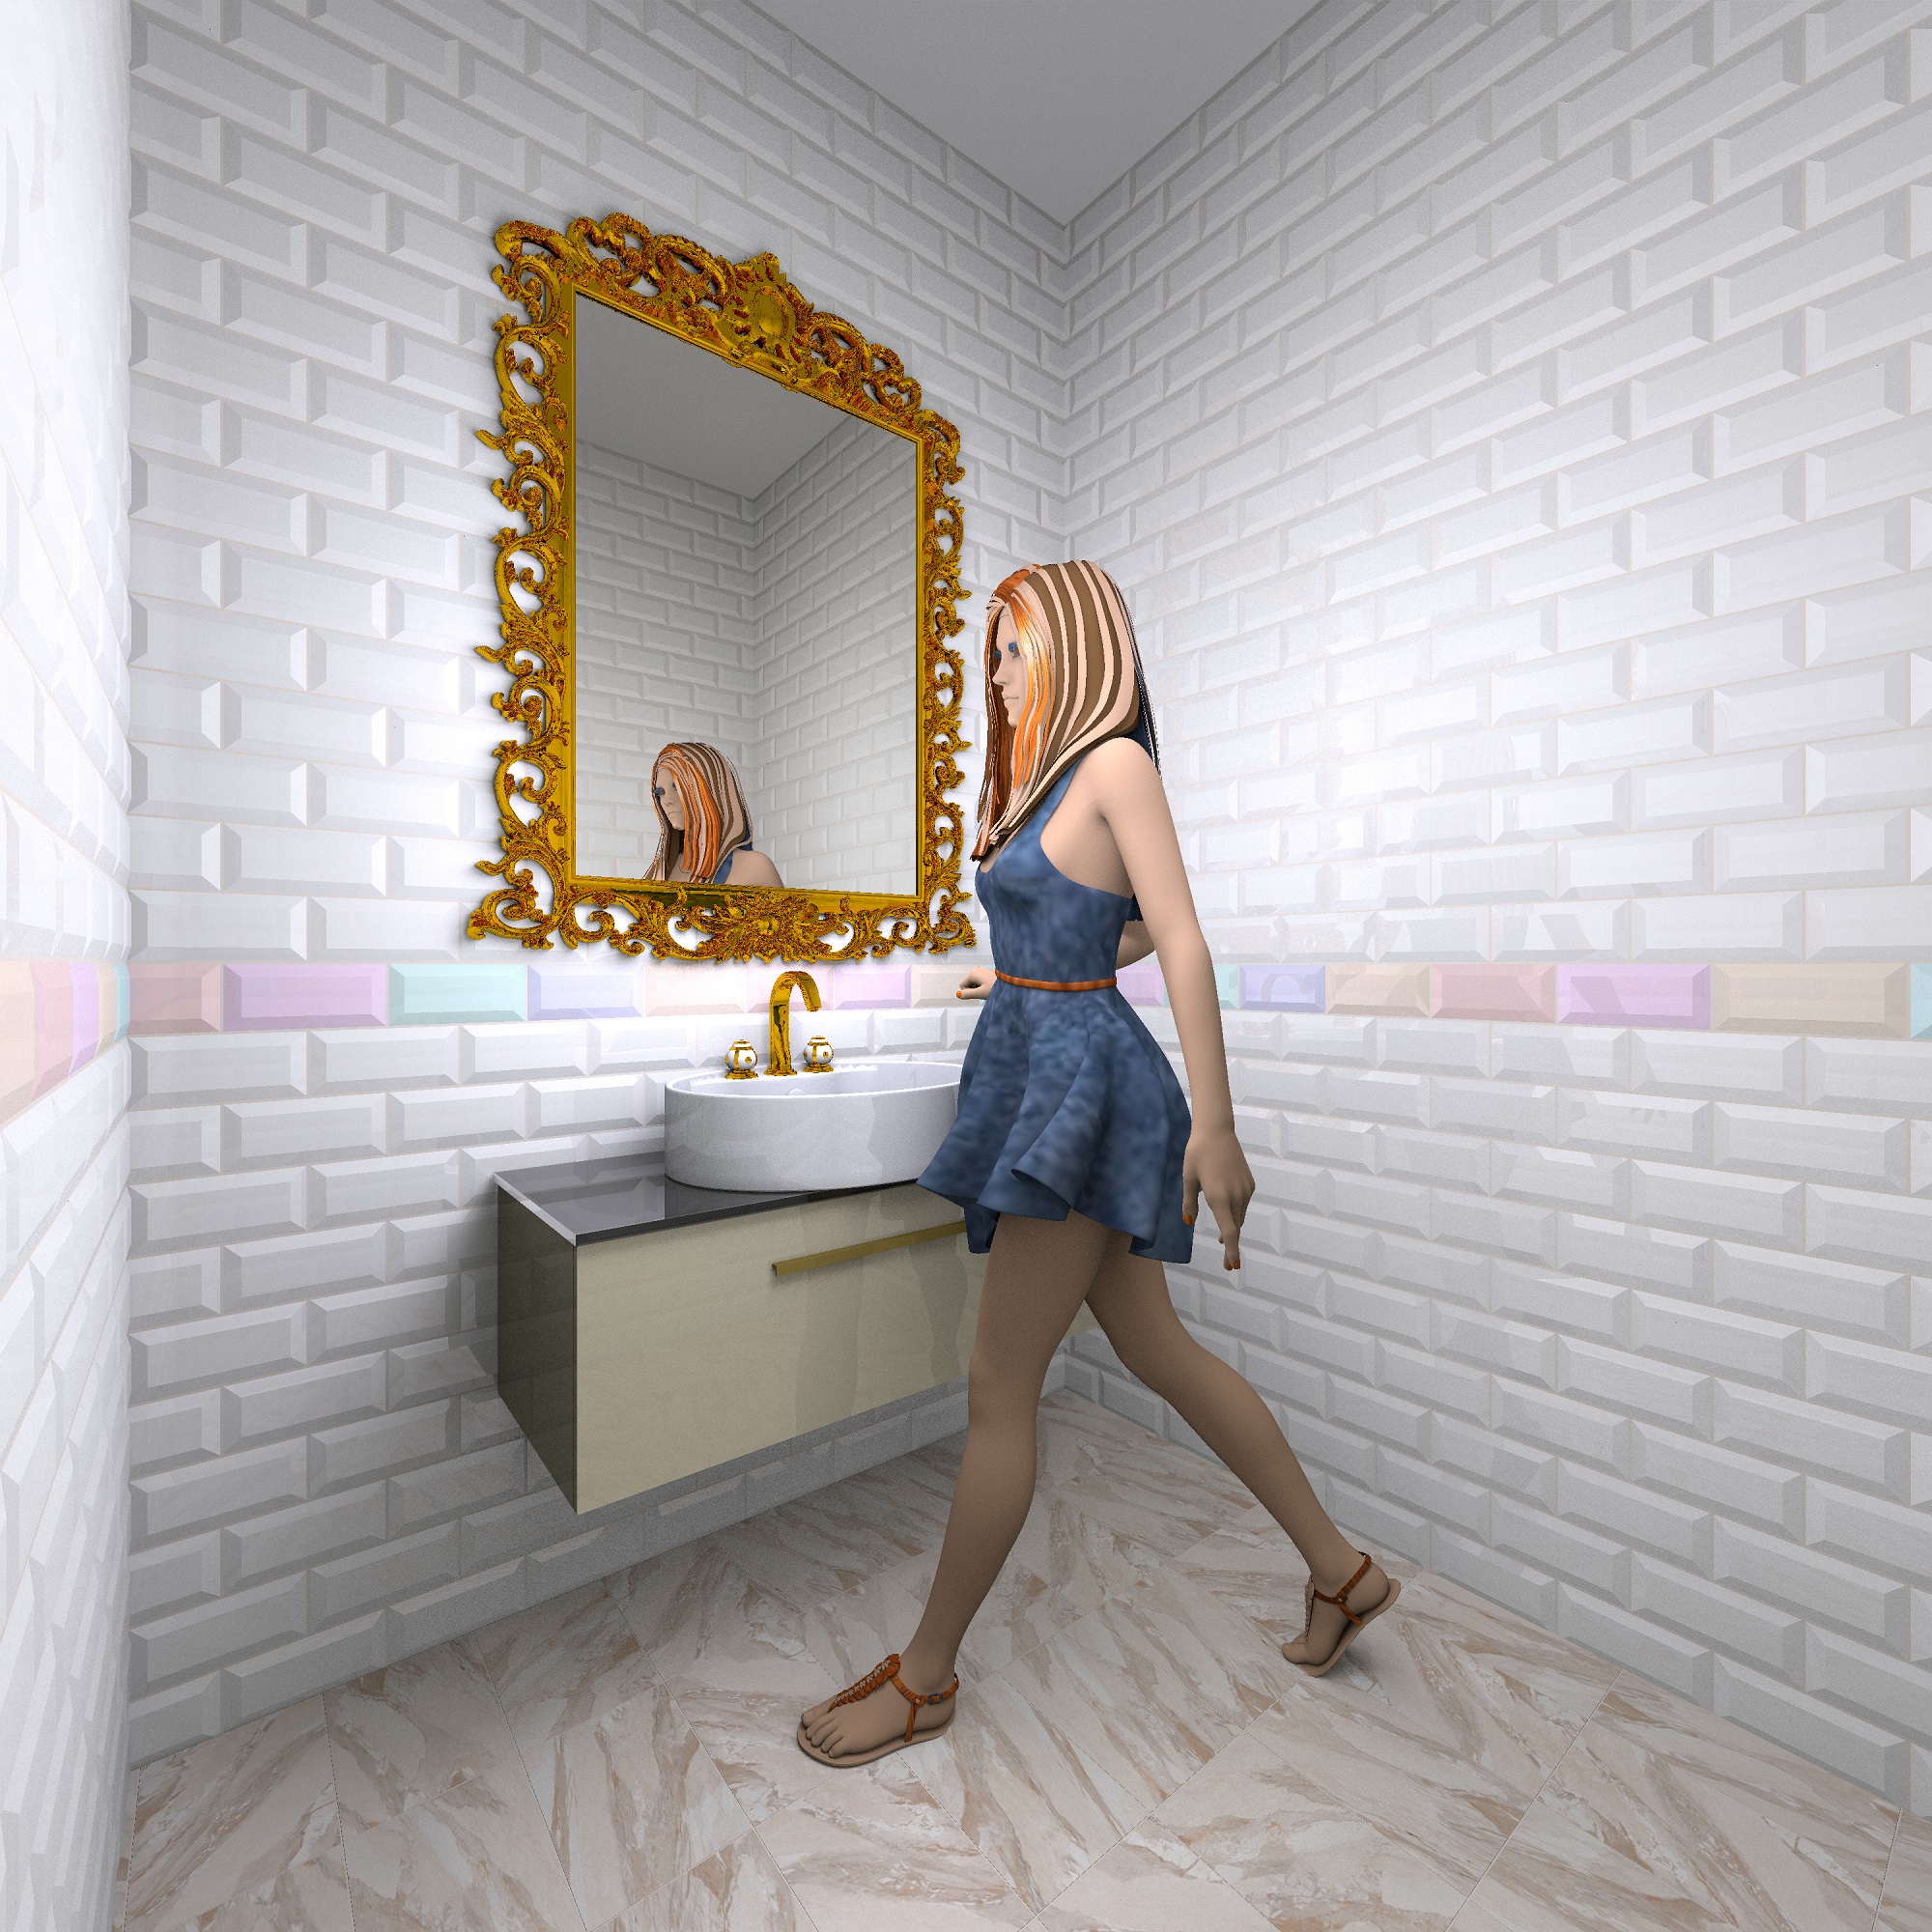
this is the final module with a tile seam edging. I made it in two parts. 1. This is a 10x20 cm box with a height of 1 cm. 2. The generated faceted shape with the same size is 10x20 cm, it needs to be raised by 1 cm. These two shapes need to be combined, and then the upper faceted shape in the size chart should be reduced to 9.6 x 19.9 cm. It will decrease evenly and you will get a 2 mm edge around the entire perimeter. This will be half the width of the seam. I set the tile seam to 4 mm, which is normal for a classic small handmade tile. Such a module can now be assembled into rows using a magnet, copied and laid out on the floor in the size of the wall. The seams (box) can be painted in one color, the faceted upper part in another, assign gloss, for example. This module can be exported to OBJ and returned back to the program as a named model. This method allows you to very carefully lay out the entire wall cladding, without cracks and irregularities, using a magnet and alignment. After that, the entire large group of modules needs to be exported to OBJ and returned as a model, but now you can rotate everything vertically to cover the wall in the bathroom. This large model cannot be corrected, in order to make changes, you need to work with the original horizontal group and turn it back into a new model of the entire wall. But such a wall with tiles looks like a real one, tiles can have a texture. I'm currently working on a more complex texture using a "Relief Generator", where you can perfectly make complex bumpy ceramics on a rectangular tile shape (I'll try to show you the result later). Next, I took the sink on the cabinet with the faucet. Using a 90cm green box template, I raised the sink to the level of the bowl template. I decided to replace the bad mixer and found a beautiful option. Using a picture search, I determined that this is the A7A model from the THG factory. I found a drawing with the exact dimensions. I put it in these sizes and put it in place of the old ugly mixer. The girl with the pink pattern is 150 cm tall, she walks with a long stride, so her height will not be 150 +15 cm, but higher, 150 +20 cm = 170 cm.
Netherlands
Joined: Apr 8, 2022
Post Count: 1248
Status:
Offline
Re: A way to make any model in the correct sizes
Great looking tiles! I created a very similar wall some time ago, also using the shape generator (which I use a LOT). But... the result is a wall with a huge object size, which for my big projects is a no-no.
Of course I consider myself a bit of an optimization magician Create the shape as you did but make the back invisible before export. You don't see it anyway. That's just two triangle faces (or a single quad face) but with a thousand tiles it adds up. For the box under the shape only use the top of it as the seam. That's another bunch of faces you can rid of. A nice trick is to make the box top (seam) invisible with d 0.0. That way you can use the wall itself for the seam color. Much more efficient if the seam needs a texture instead of a color: only a single texture on the wall instead of on every tile. You will be surprised how much that reduces the overall object size!
---------------------------------------- Dodecagon.nl 950+ 3D models, manuals, and projects
Russia
Joined: Aug 13, 2022
Post Count: 481
Status:
Offline
Re: A way to make any model in the correct sizes
As always, great advice from Keet! Unnecessary sides of the box - it really increases the time a lot, I agree. You have to get rid of them without regret))))
Netherlands
Joined: Apr 8, 2022
Post Count: 1248
Status:
Offline
Re: A way to make any model in the correct sizes
Even more extreme optimization: don't add the box top for the seam. Use the multiplier plugin to repeat tiles with the vertical 4mm space for the seams into a row. Then multiply the row with the 4mm space for the horizontal seam. Set the seam color/texture on the wall. Another few thousand faces saved
---------------------------------------- Dodecagon.nl 950+ 3D models, manuals, and projects