hi everyone,
a little unconventional question : how would you create a house looking like in the Fallout game :
old
crippled
maybe even a little destroyed
thanks
fallout look ?
This topic has been viewed 1833 times and has 5 replies
Re: fallout look ?
Would something like this be any good
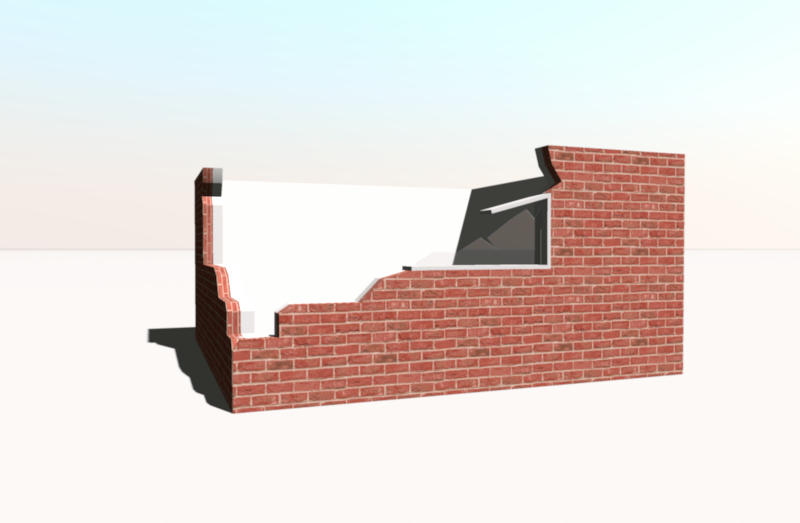
If it is the the you can download the sh3d file this will show you how i made these walls, and then modify them or create new to suit your own needs.
Good luck, be interesting to see some results in the gallery.
Mike
If it is the the you can download the sh3d file this will show you how i made these walls, and then modify them or create new to suit your own needs.
Good luck, be interesting to see some results in the gallery.
Mike
Re: fallout look ?
thank you, both examples are great !
Re: fallout look ?
looking at your example "damaged walls" , how did you achieve this? did you use polylines? i never used this before.
thank you
thank you
Re: fallout look ?
if you take a look at level 1 you will see the damaged walls, created them on level 1 so i could set the depth of the floor to 250 to match the wall thickness, you can set these to suit your own project.
I drew these with the "create room" tool, this method would enable you to create a wall with as much or little damage as you wish. Once drawn and textured you can export it, 3d view>export to object format, then import it, furniture>import furniture>scroll to where you saved it, during the import you can change its orientation.
The 3 walls that make up the damaged window frame went through the same process, as did the broken glass, only difference here was to make the glass clear before exporting it, 3d view>modify 3d view> use the slider to change the wall transparency, near maximum. Remember to reset this.
All these were positioned on level 0 then joined with normal walls.
After importing each can have its height, width/thickness changed a normal
Also shown is a room with a hole for a window, this same method could be used for bullet holes etc, draw that perimeter of the wall clockwise and the inner anti-clockwise.
The same technique could be used for roof sections, angling them during import or after.
Good luck
Mike
I drew these with the "create room" tool, this method would enable you to create a wall with as much or little damage as you wish. Once drawn and textured you can export it, 3d view>export to object format, then import it, furniture>import furniture>scroll to where you saved it, during the import you can change its orientation.
The 3 walls that make up the damaged window frame went through the same process, as did the broken glass, only difference here was to make the glass clear before exporting it, 3d view>modify 3d view> use the slider to change the wall transparency, near maximum. Remember to reset this.
All these were positioned on level 0 then joined with normal walls.
After importing each can have its height, width/thickness changed a normal
Also shown is a room with a hole for a window, this same method could be used for bullet holes etc, draw that perimeter of the wall clockwise and the inner anti-clockwise.
The same technique could be used for roof sections, angling them during import or after.
Good luck
Mike
Who is online
Users browsing this forum: No registered users and 1 guest