Streets and Roads
This topic has been viewed 22301 times and has 32 replies
Streets and Roads
I am attempting to create my plot or site plan. I need a street or road to go along the side of the property in 2D view. How can I do that?
Re: Streets and Roads
Just draw a room the size and shape you need your road to be, modify it to not show a ceiling and texture the floor with 1 of the "pavement" textures, in the recently released library 1.7 there are some road markings too
Re: Streets and Roads
Thanks. And what can a person do for a curved driveway?
-
Bubblobill
- Posts: 77
- Joined: Sun May 21, 2017 2:09 pm
- Country: Australia
Re: Streets and Roads
You use the same trick using curved walls.
Draw the shape with walls so that the area is enclosed.
Change to the room tool thing, double click in the enclosed area to create the room.
Change the wall height to something along the lines of a kerb or delete them altogether.
Modify the room as for the road.
Draw the shape with walls so that the area is enclosed.
Change to the room tool thing, double click in the enclosed area to create the room.
Change the wall height to something along the lines of a kerb or delete them altogether.
Modify the room as for the road.
Re: Streets and Roads
I must be doing something wrong. I created a room, but there is no way to curve it that I can find.
For my street, I can create the room, which is okay for the straight street, but the option to add the payment is not available.
For my street, I can create the room, which is okay for the straight street, but the option to add the payment is not available.
Re: Streets and Roads
Not sure what you refer to as "add payment", are you using google translate?
Look at this image
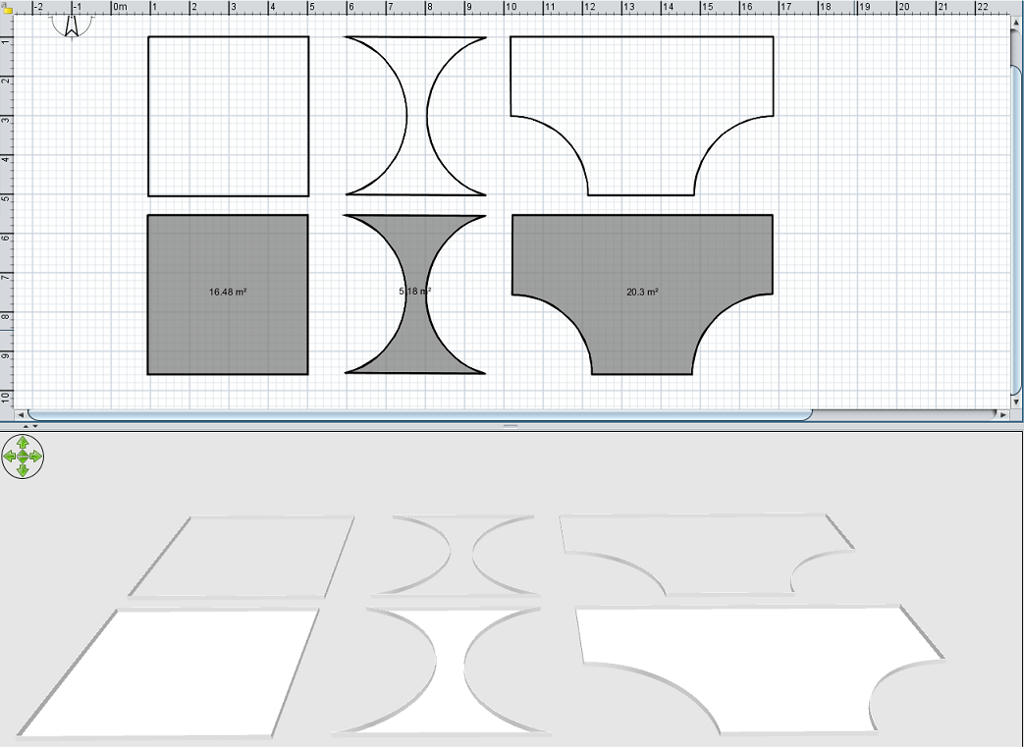
The top row is 3 shapes created with walls, the 2nd has an arc added to the 2 side walls, the 3rd was made with 6 walls, this also has an arc on 2 of its walls.
Arcs can be added either in the walls modification window, you will see Arc in the bottom right corner
or
move your mouse pointer to the centre of a wall, where the wall has an arrow on one side, your pointer will change to a double arrow, you can then left click your mouse and drag the wall to form your arc. Once you have achieved the shape you need select the room tool and double click within the borders formed by the walls, remember, for this to work all the walls MUST be joined.
This method, when used on a level with an elevation of 0 will give you a shape that has no depth.
If you use the same method, but at an elevated level where the floor has a depth, the shape you create will have that depth, very handy for creating custom kitchen worktops, steps, lintels, copings etc. For these you can export your room and import it as an object.
And don't forget you can use the room tool to create a shape without the use of walls, just select the tool and draw in your 2d window by randomly clicking the mouse
Look at this image
The top row is 3 shapes created with walls, the 2nd has an arc added to the 2 side walls, the 3rd was made with 6 walls, this also has an arc on 2 of its walls.
Arcs can be added either in the walls modification window, you will see Arc in the bottom right corner
or
move your mouse pointer to the centre of a wall, where the wall has an arrow on one side, your pointer will change to a double arrow, you can then left click your mouse and drag the wall to form your arc. Once you have achieved the shape you need select the room tool and double click within the borders formed by the walls, remember, for this to work all the walls MUST be joined.
This method, when used on a level with an elevation of 0 will give you a shape that has no depth.
If you use the same method, but at an elevated level where the floor has a depth, the shape you create will have that depth, very handy for creating custom kitchen worktops, steps, lintels, copings etc. For these you can export your room and import it as an object.
And don't forget you can use the room tool to create a shape without the use of walls, just select the tool and draw in your 2d window by randomly clicking the mouse
Re: Streets and Roads
The 3rd shape shown is a representation of a turn-around point for a car.......it is NOT a pair of pants...as my mrs has just commented
Re: Streets and Roads
Thanks all.
@Mike53, that should be pavement. Sometimes I am just too sloppy. Sorry.
@Mike53, that should be pavement. Sometimes I am just too sloppy. Sorry.
-
bdfd

- Posts: 2614
- Joined: Sat Mar 29, 2014 7:17 am
- Country: LILLE, Les Hauts de France, Western Europa
Re: Streets and Roads
Hi,
Just look at the exteriors of my projects.
I created few different streets with plenty of details…
[;)]
.
Just look at the exteriors of my projects.
I created few different streets with plenty of details…
[;)]
.
Evil progresses when good people do nothing!
---
SH3D 7.1 and nothing else - W11 64b in 4K
---
SH3D 7.1 and nothing else - W11 64b in 4K
Who is online
Users browsing this forum: No registered users and 2 guests